
How We Gave My Sister a Budget-Friendly Kitchen Makeover (Without a Full Reno)
This Post May Contain Affiliate Links. Please Read Our Disclosure Policy.
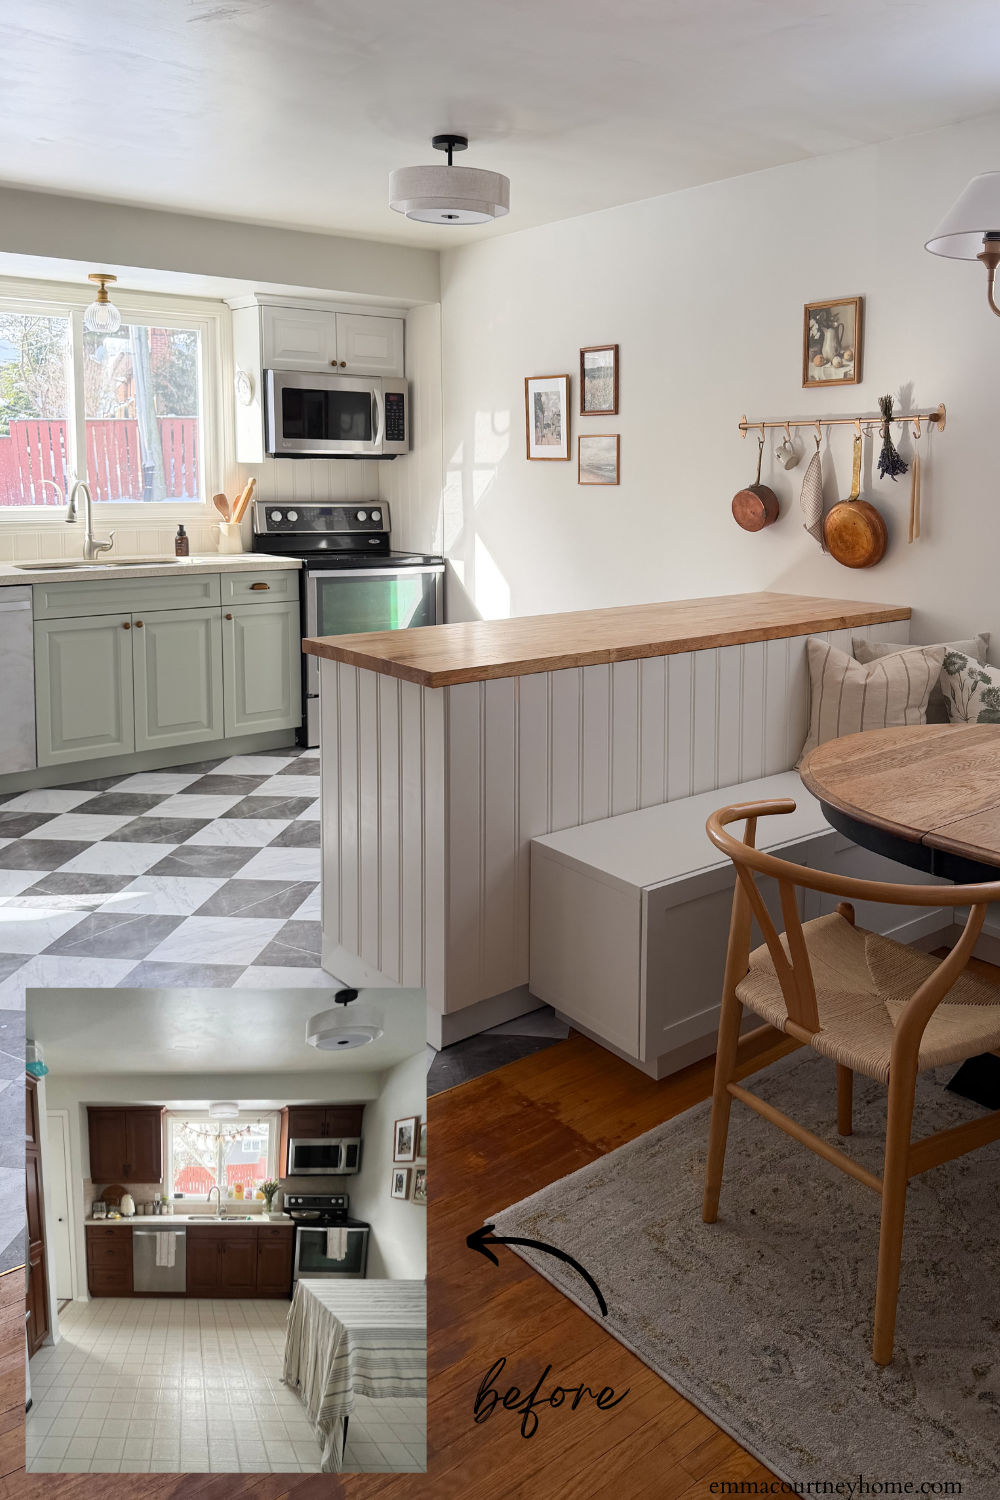
When my sister and her husband bought their house, the kitchen was actually in great shape, but it didn’t feel like theirs. Since they’re planning a full renovation in about five years, we decided to tackle a budget-friendly kitchen makeover to make the space brighter, more functional, and more enjoyable to live in now, without committing to a full reno.
Add to that the fact that my sister was in the final weeks of pregnancy when we decided to tackle this project, and the goal became very clear: a budget-friendly kitchen makeover that felt good to live in now, without committing to a full renovation. Honestly, my dream project! I love being creative with a budget.
This ended up being a full family project, hands-on, lots of DIY, and incredibly rewarding. In the end, the space feels brighter, more open, and completely transformed, all for around $2,500, including a peninsula, breakfast nook, new lighting, and finishes.
Estimated reading time: 12 minutes

The Starting Point for This Budget-Friendly Kitchen Makeover
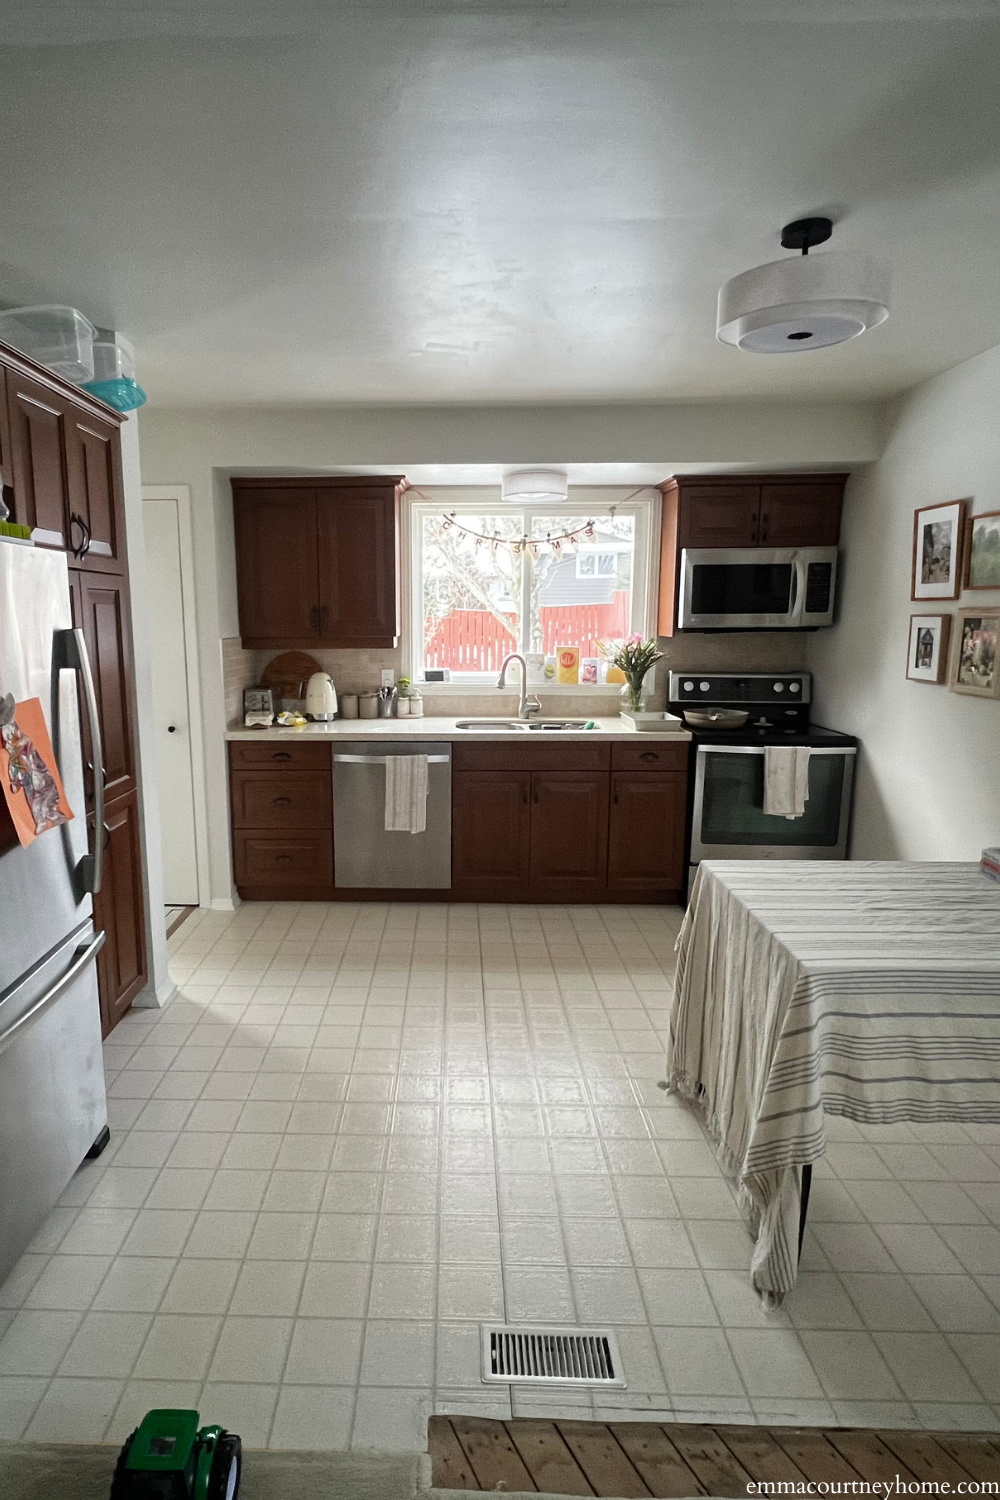
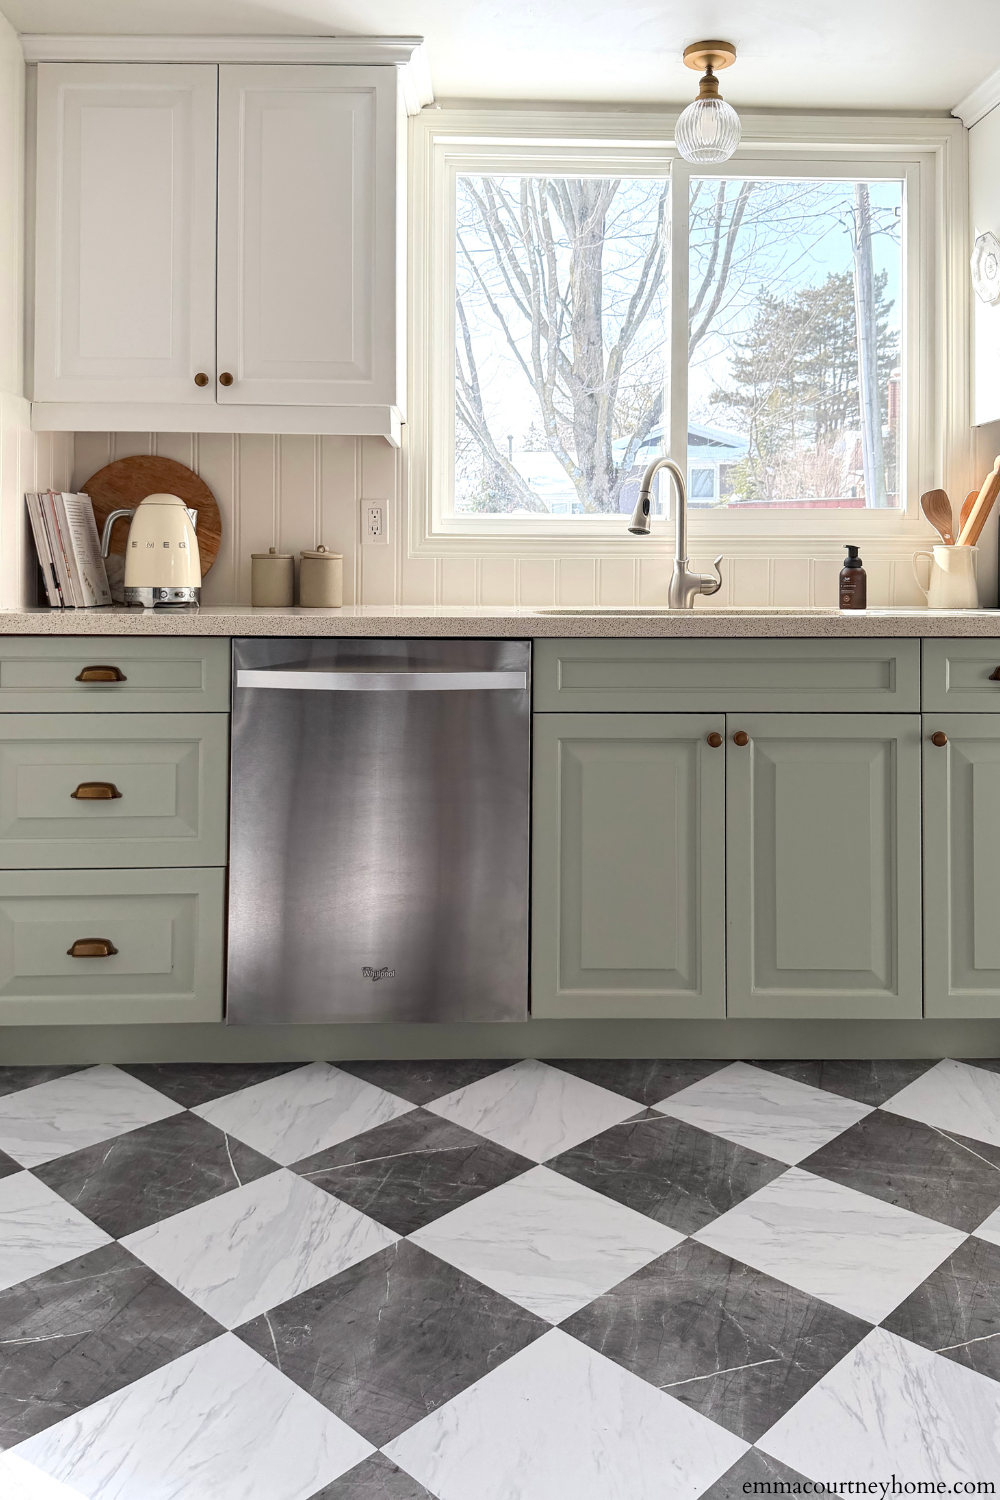
The original kitchen had darker wood cabinets that my sister never loved. They were good quality, but they made the space feel heavy and dated. On the day they took possession of the house, they also removed the wall between the kitchen and dining room to open up the space. That helped immensely, but it created a new problem.
Once the wall came down, an awkward gap in the flooring remained between the kitchen and dining room. The kitchen had linoleum, the dining room had carpet, and we were hoping there might be hardwood underneath. There was also a big wish list item: more counter space and a cozy breakfast nook, something similar to what we have in our own kitchen.
The solution became a peninsula that could:
- Add storage and counter space.
- Cover the flooring transition issue.
- Create a natural place for a breakfast nook to sit against
A mockup we created using AI to visualize the space’s plans. This budget-friendly kitchen makeover focused on using what they already had and making thoughtful updates that could easily be changed later.

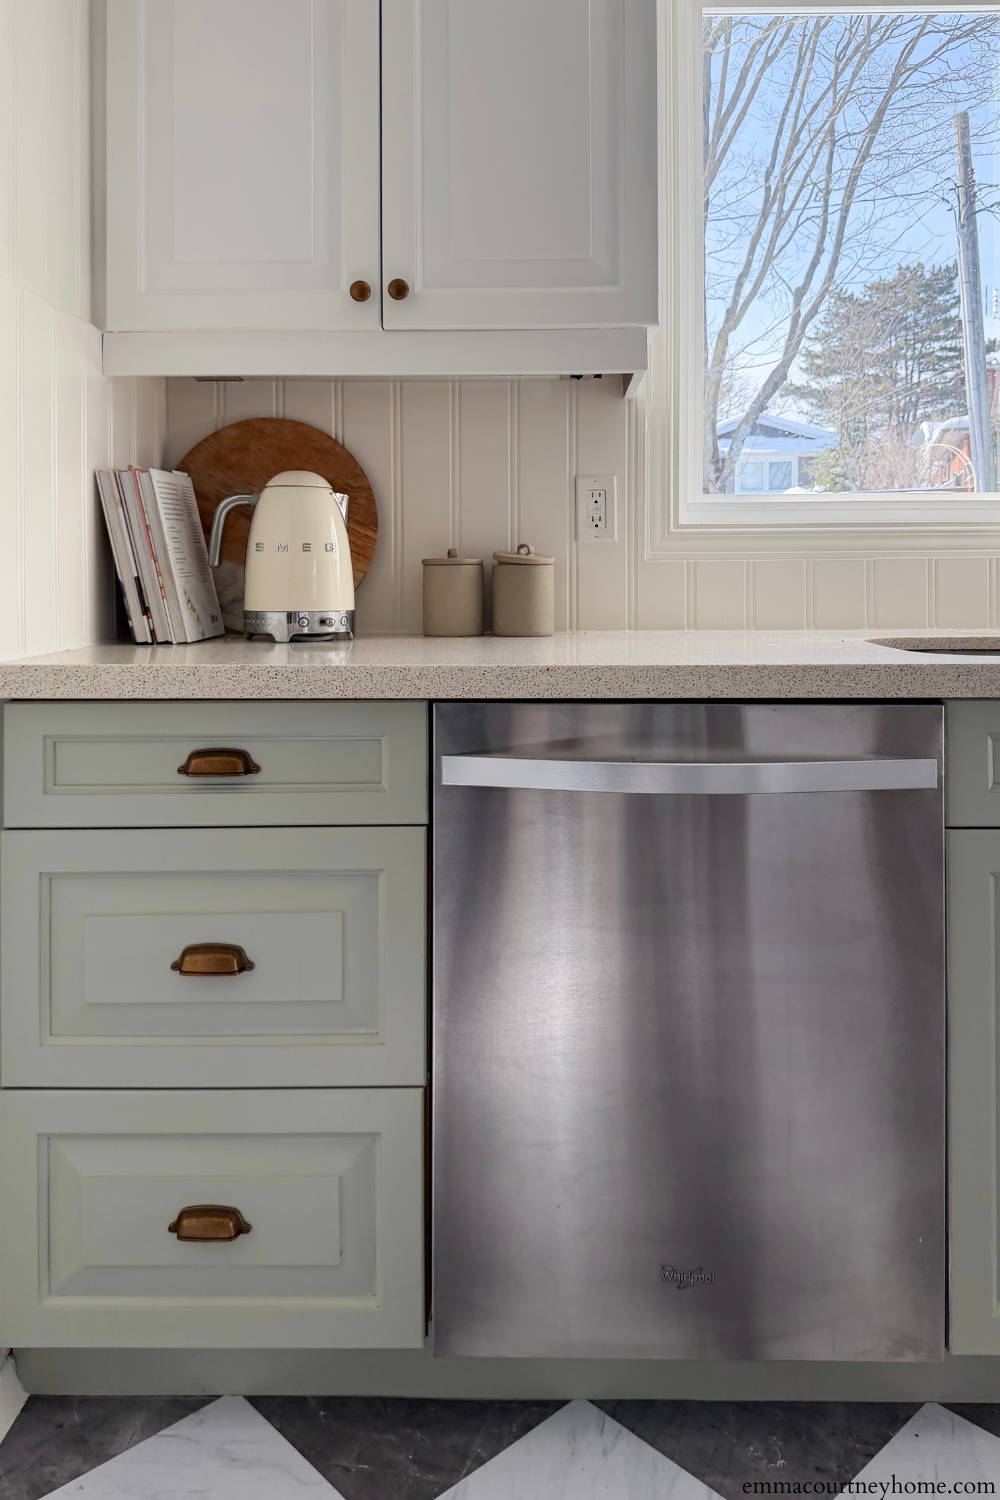
Step One: Updating Cabinet Hardware (And Filling Old Holes)
Before touching paint, we started with cabinet hardware. The cabinets originally had pulls, but my sister wanted to switch to knobs. That meant dealing with the extra holes left behind.
To fill the old hardware holes:
- We bought wooden dowels the same size as the holes.
- Cut them to length
- Covered them in wood glue
- Pressed them into the holes so they sat flush on both sides.
- Lightly sanded once dry.
- Used a small amount of wood filler and sanded again to make everything seamless
Once painted, you would never know the cabinets had different hardware before. This step is a bit tedious, but it makes a huge difference in the final result.

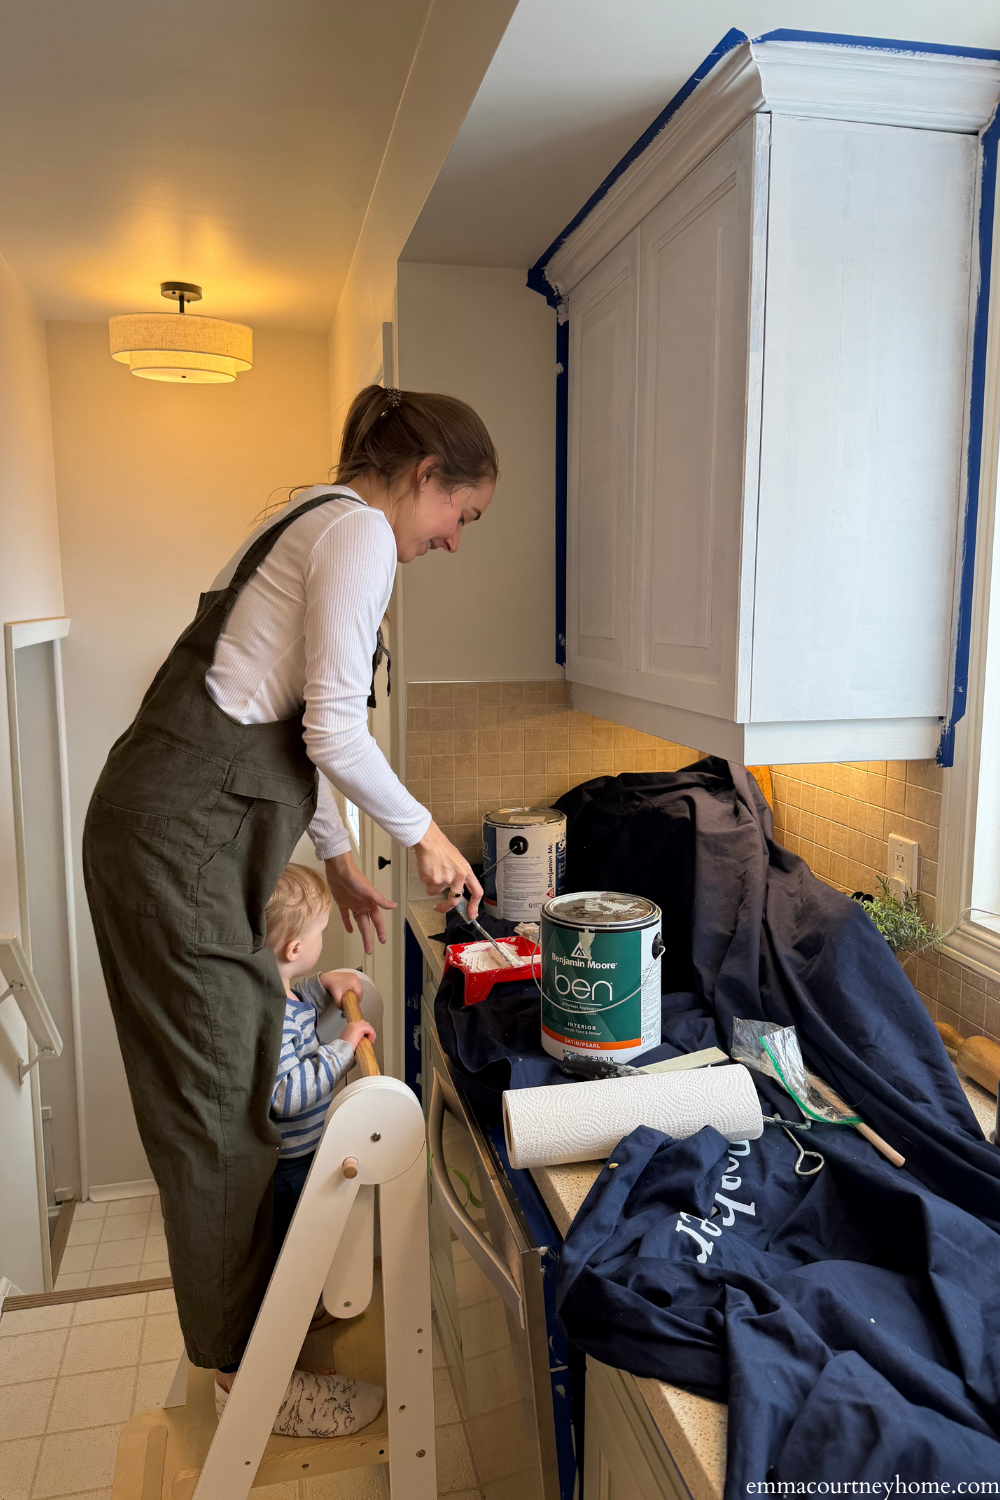
Painting the Kitchen Cabinets on a Budget
Painting was the biggest visual change in this kitchen makeover.
Paint Details:
- Primer: Sico cabinet primer on all cabinets (safer during pregnancy, but this is my favourite)
- Lower cabinets: October Mist by Benjamin Moore, pearl finish
- Upper cabinets: White Dove by Benjamin Moore, pearl finish
It took two coats of primer and three coats of paint, and the full painting process took about two to three days from start to finish, including drying time. This is also a great time to caulk any gaps where the cabinets meet the walls and ceiling.
Painting the cabinets instantly brightened the space and made it feel fresh without replacing any doors. Once everything was fully cured, we installed the new cabinet knobs and pulls, which really finished things off.
Truth be told, we already had October Mist in pearl finish from my nephew’s bedroom makeover, so we used that on the lower cabinets. I think they are going to circle back and paint all the lower cabinets (including the peninsula) in a different shade of green, though I personally love the more muted green.
A Beadboard Backsplash Instead of Removing Tile
Next up was the backsplash. Rather than removing the existing backsplash, which almost always damages the drywall and leads to more work, we decided to cover it with beadboard. Inspired by the gorgeous beadboard in my friend Julie’s kitchen.
We used primed beadboard sheets from Home Depot. My brother-in-law measured and cut each piece to fit using a jigsaw, working carefully around outlets and edges. We attached the beadboard directly over the existing backsplash using No More Nails adhesive.
This is one of my favourite budget-friendly kitchen tricks:
- No demo required
- No drywall repair
- Easy to remove later if needed
We added small pieces of trim where necessary to make everything feel finished and intentional, and we caulked along the edges and used silicone where the beadboard met the countertop.
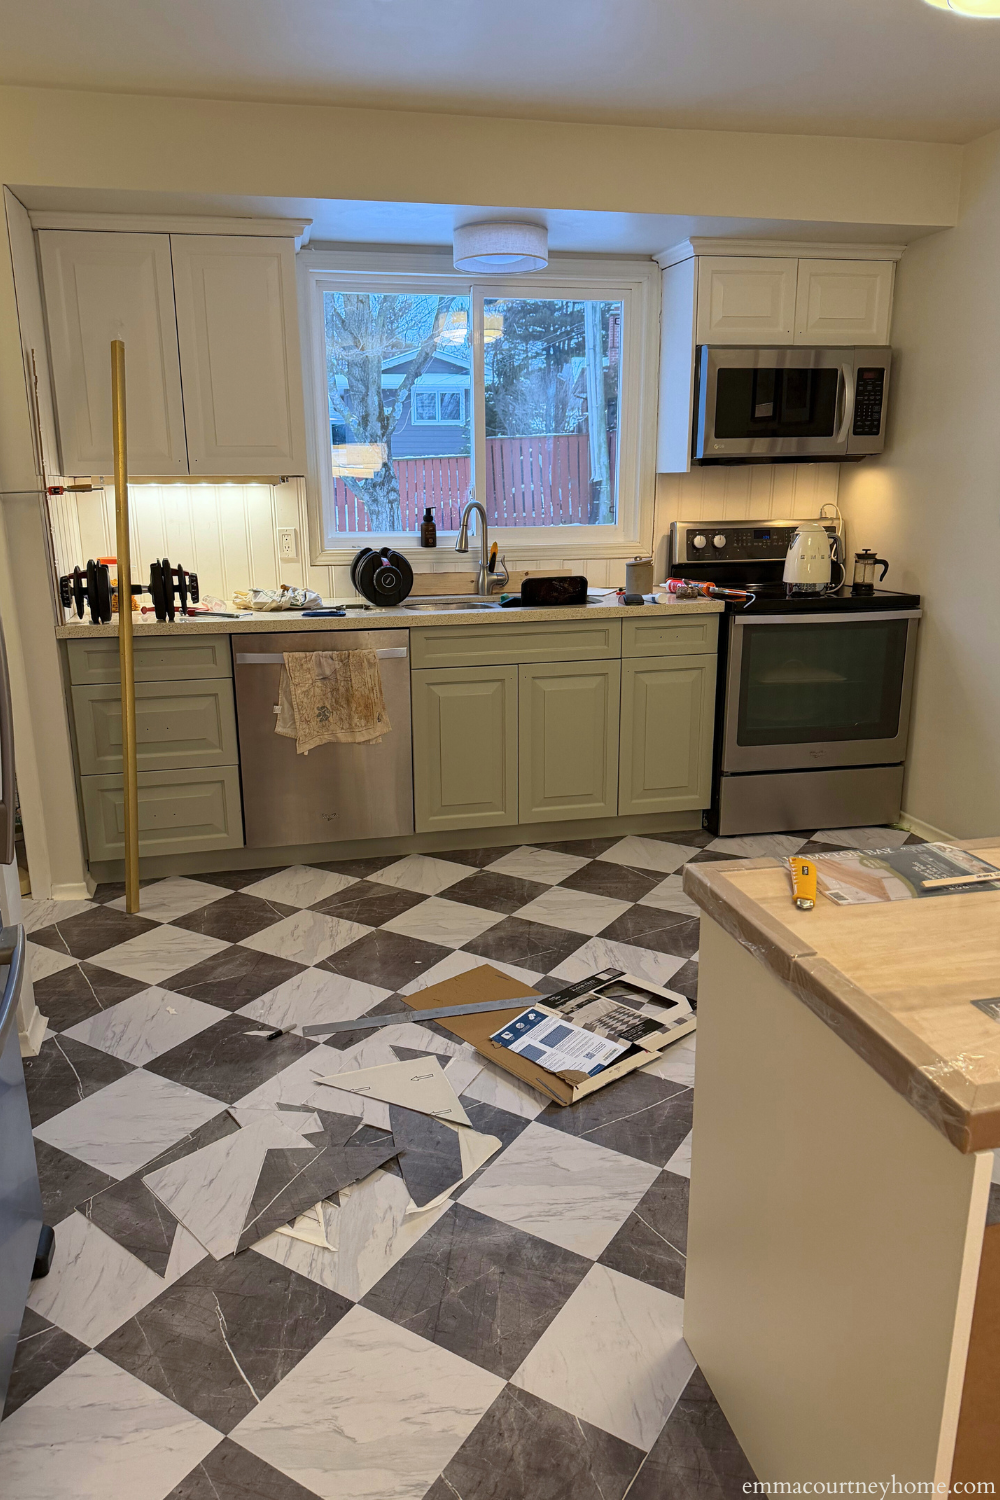
Fixing the Flooring Situation Without a Full Replacement
While the backsplash was being installed, my mum and I tackled the floors.
Originally, the dining room had carpet, and the kitchen had linoleum. One evening, my sister and her husband pulled up the dining room carpet and discovered hardwood underneath. It wasn’t perfect, but it was absolutely salvageable with future sanding and refinishing.
The kitchen did not have hardwood under the linoleum, so we decided to use peel-and-stick tile, the same kind I have had in my entryway for over three years with great results.
Installing the peel-and-stick tile took us almost an entire day of work (a few days of a sore back), but it immediately made the space feel cleaner and more cohesive. For the transition between the hardwood and tile, we used the same simple, inexpensive transition strip I used in my entry, which blends the two surfaces together nicely.
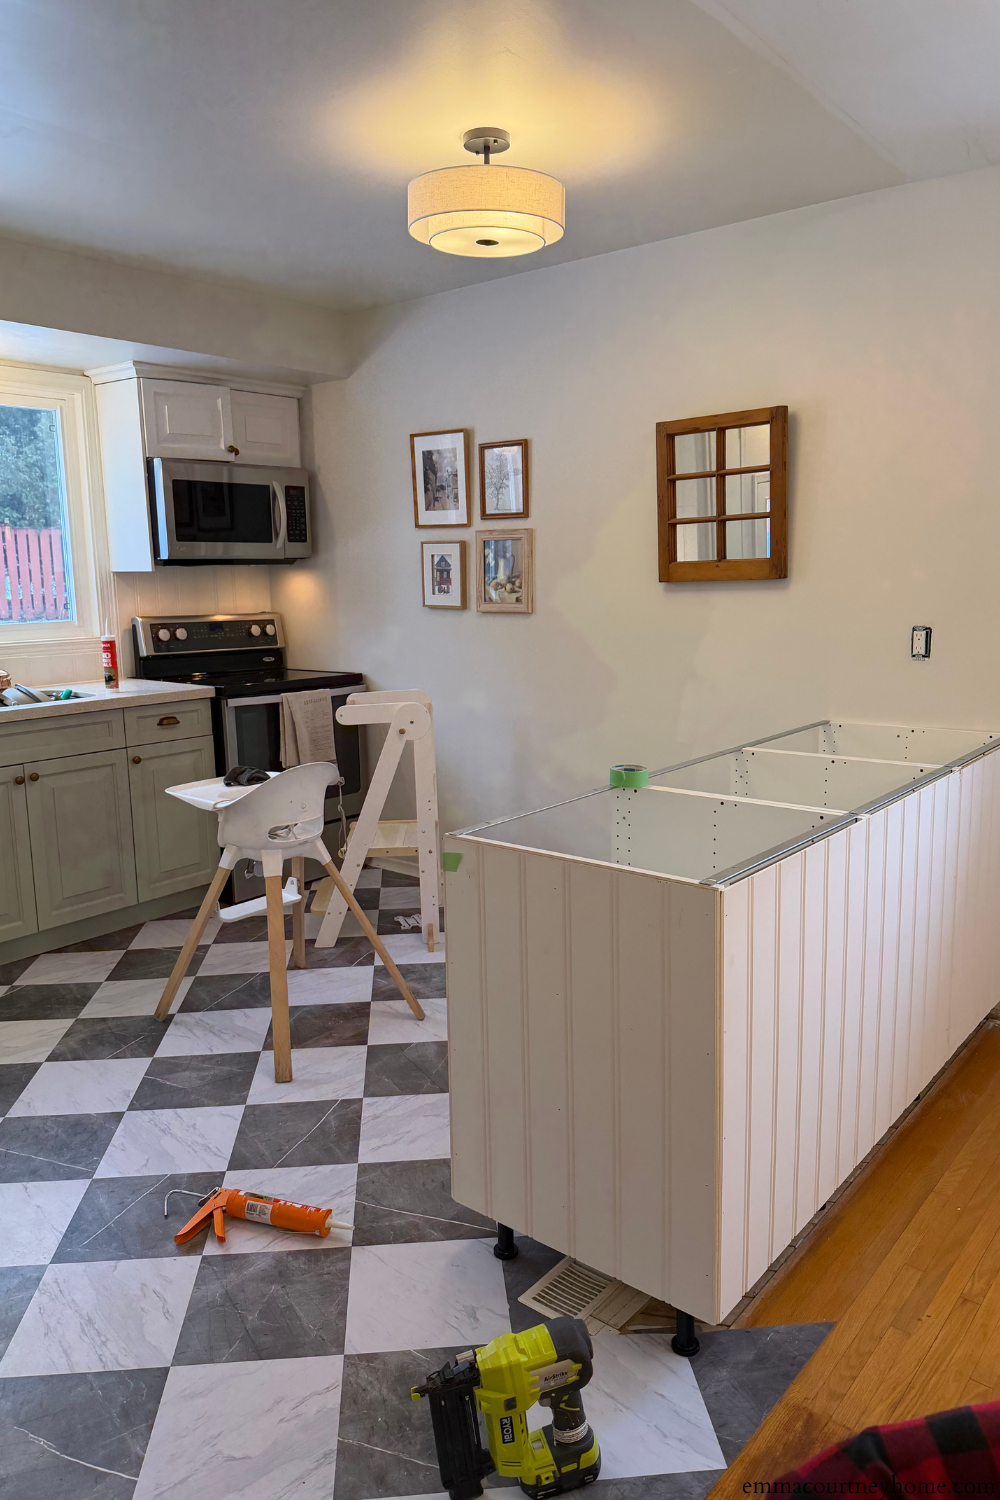
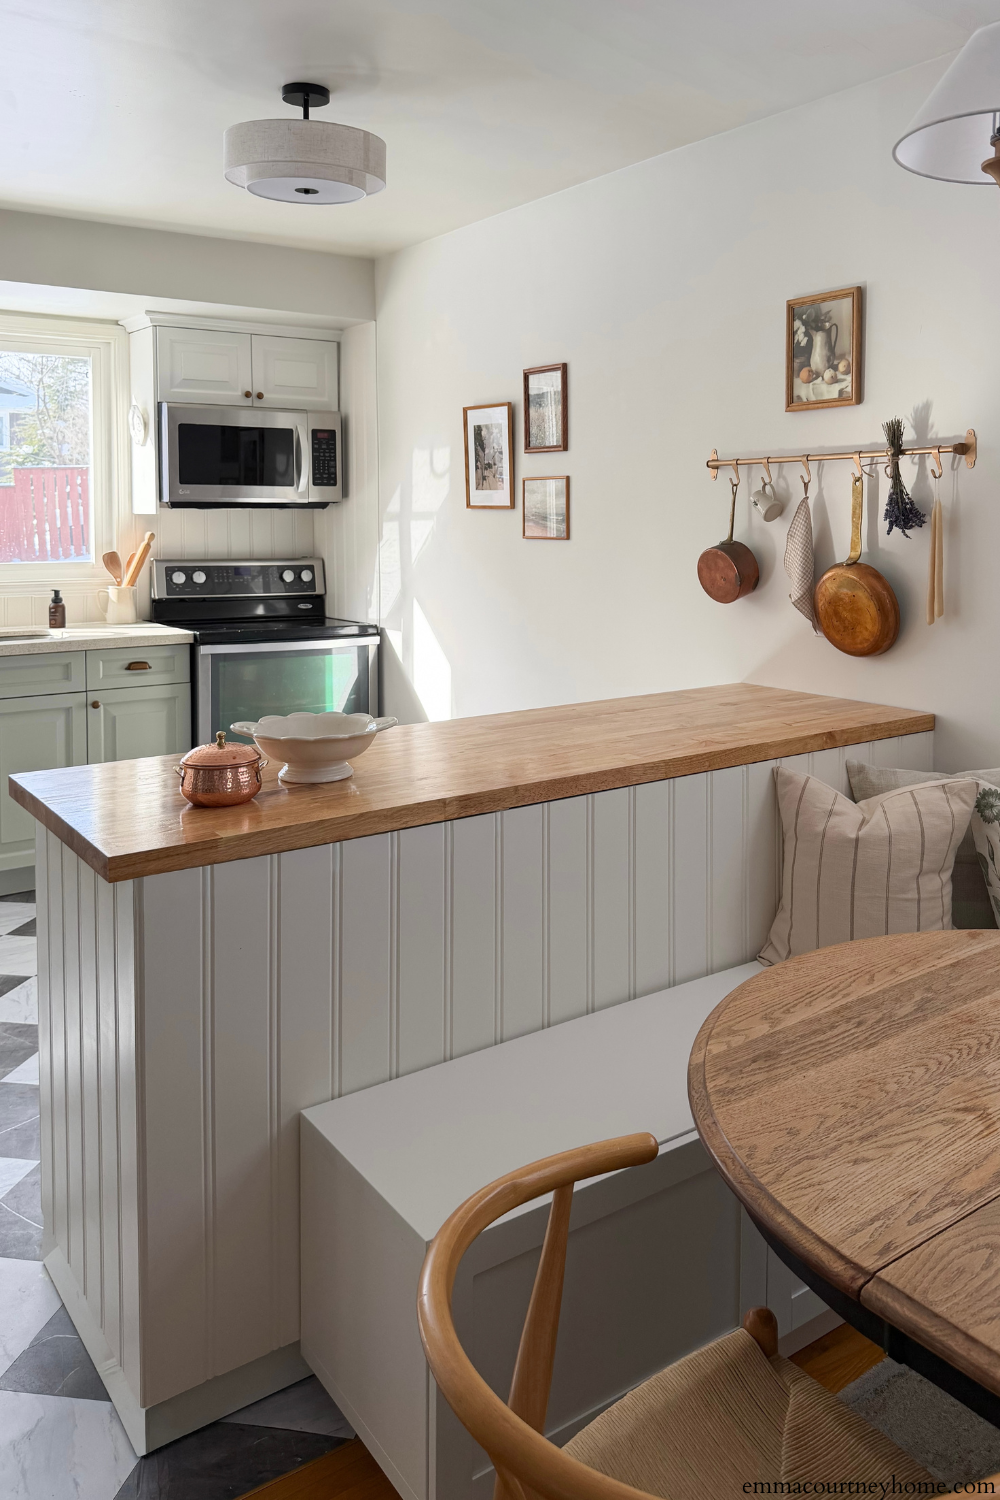
Building an IKEA Sektion Peninsula for a Budget-Friendly Kitchen Makeover
To solve both the flooring gap where the wall used to be and the lack of counter space, we built a peninsula using three 24-inch IKEA Sektion cabinets.
My sister and my husband, Chris, assembled the cabinets in advance (while we laid the flooring). On a later visit, my dad and I anchored the peninsula to the floor using IKEA’s kitchen rail system and installed the kick plates. My recommendation is to use the IKEA kitchen planner because it will tell you all the pieces you need to complete the peninsula!
The peninsula became a key part of this budget-friendly kitchen makeover, solving multiple problems at once.
To make the peninsula feel custom:
- We used beadboard on the exposed side and back.
- Added trim for a finished look
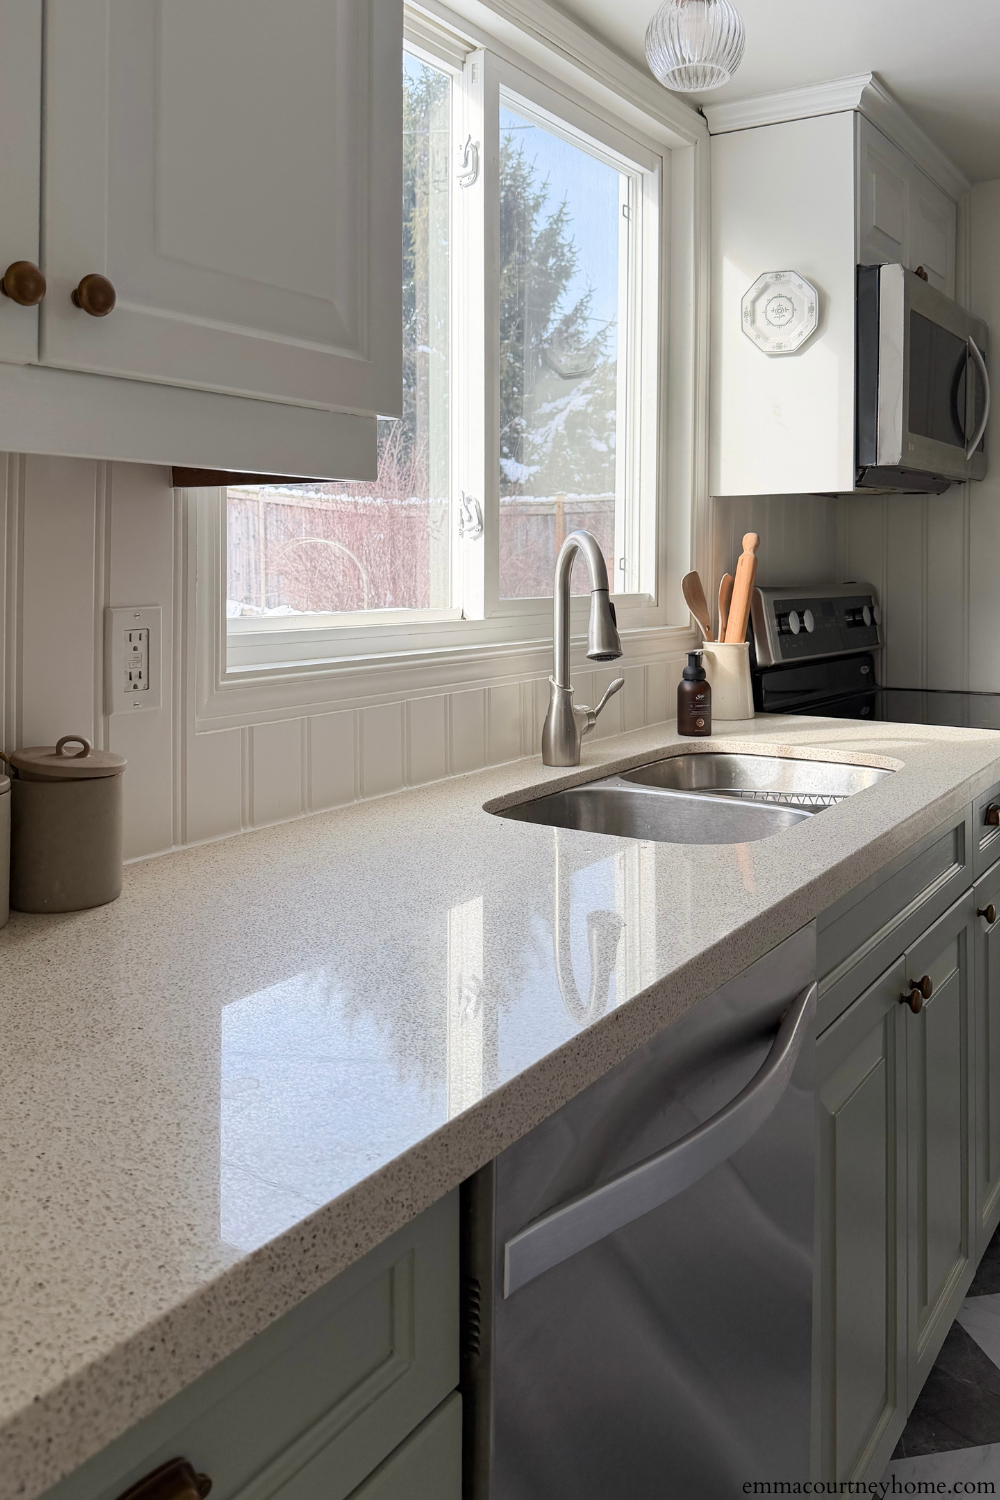
For the countertop, they chose a butcher block, finished with tung oil. This part took the longest, about a week of coats in a well-ventilated space, but the result was worth it. It added so much warmth and character, and they didn’t need to worry about matching it to the existing countertops.
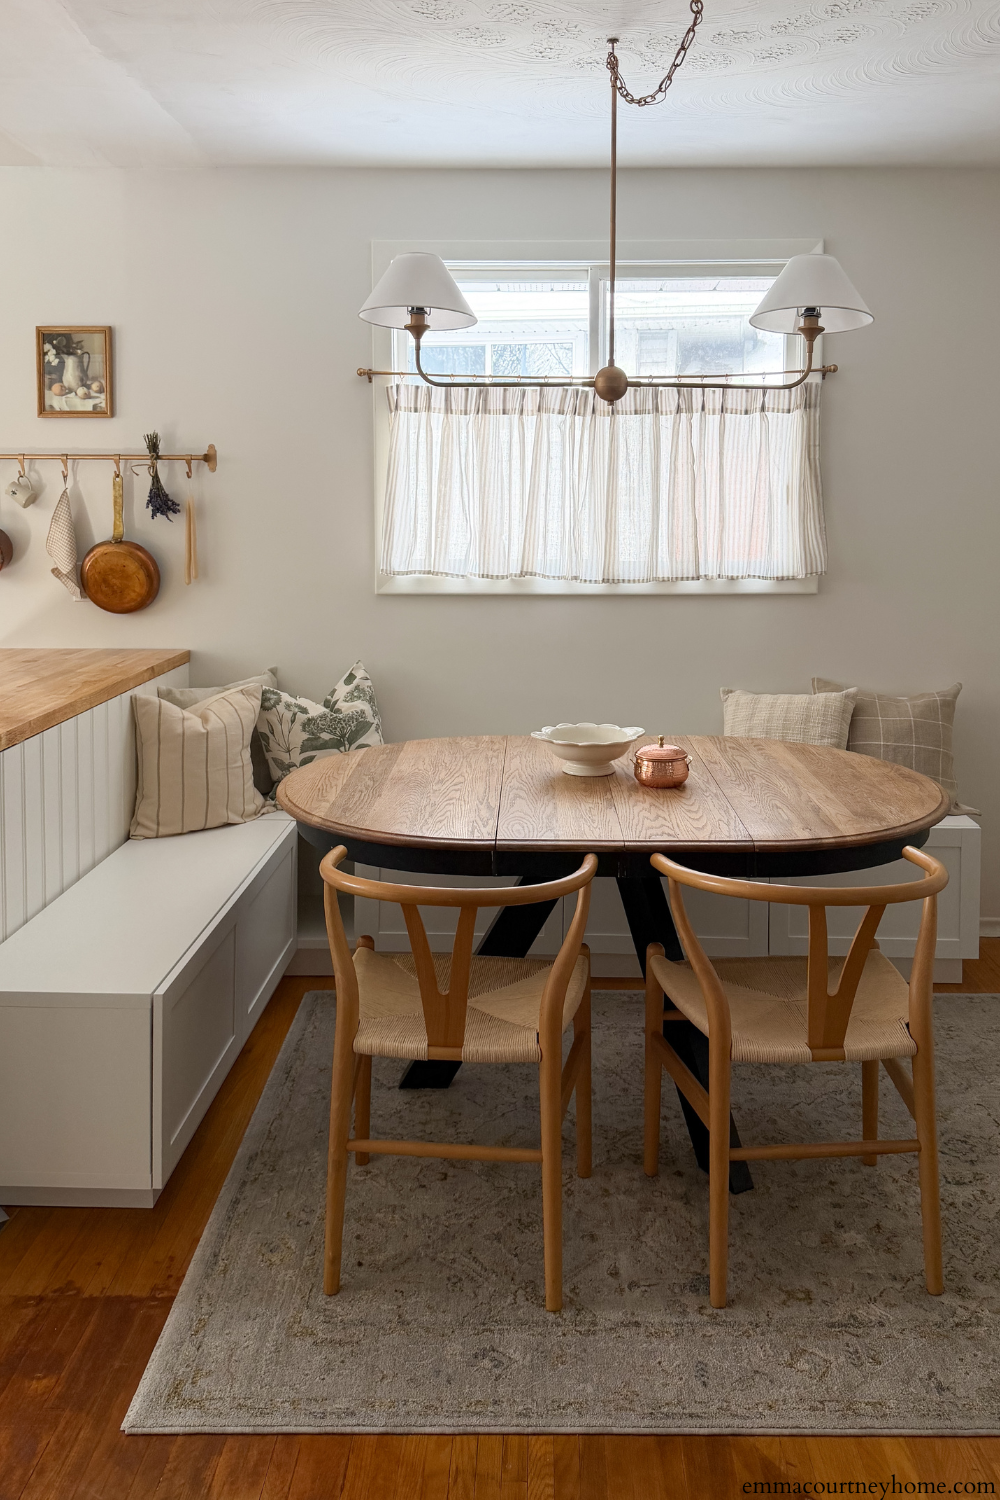
Adding a Cozy Breakfast Nook
With the peninsula in place, we moved on to the breakfast nook. This was something my sister really wanted: a cozy spot for everyday meals, snacks and, eventually, for kids to sit and do homework, like we did!
I won’t go into all the details here, but I will share the full breakfast nook build in a separate post, which I’ll link if you want to recreate something similar in your own home.
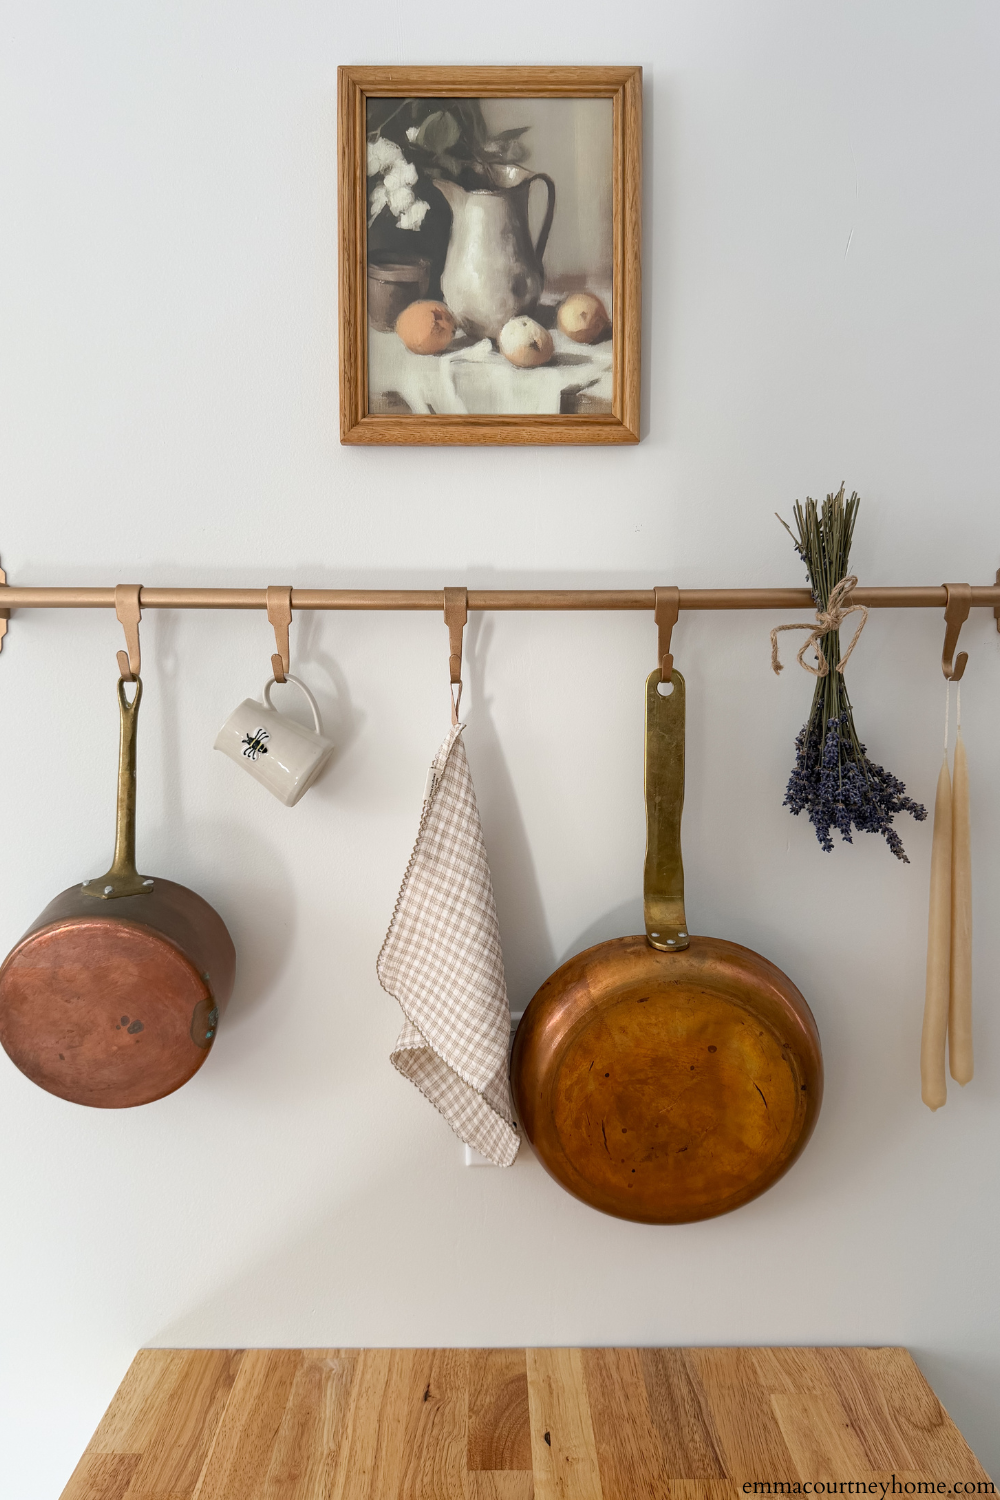
Lighting, Finishing Touches, and Styling
To finish the space, we swapped out the lighting. We chose one light for over the sink and a larger statement fixture for the dining area. The dining chandelier got a little Rub ’n Buff treatment to better match the rest of the finishes, which made a huge difference.
We also:
- Installed an IKEA pot rack over the peninsula and adjusted the finish with Rub ’n Buff
- Added art and a few thrifted pieces
- Styled the space simply so it still felt functional and livable
Overall, this budget-friendly kitchen makeover completely changed how the space looks and functions, without the cost or stress of a full renovation.
The Final Result and Total Cost
This kitchen feels like a brand-new space, even though almost everything is original.
Total spend: approximately $2,500
That includes:
- Painted cabinets
- New hardware
- Beadboard backsplash
- Peel-and-stick flooring (also purchased for the entry and back stairs)
- IKEA peninsula with doors
- Butcher block countertop
- Breakfast nook
- New lighting
Most importantly, it feels good to live now, which was the entire goal. This is proof that you don’t need a full renovation to completely change how a kitchen feels.
If you’re planning a bigger reno down the line but want something you can enjoy in the meantime, a budget-friendly kitchen makeover like this can be the perfect in-between solution.
Shop this project:
- Cabinet Knobs
- Cabinet Pulls
- Peel and Stick Flooring
- Transition Strip in 0.66cm size
- Beadboard (CA) or Similar (US)
- No More Nails Adhesive (CA) or Similar (US)
- Semi-flush light
- Chandelier
- Cafe Curtains
- Curtain Rings
- Curtain Rod (I bought one in store, linking an alternative)
- Rub n Buff in Antique Gold
- Pot Rail and Pot Hooks
- Butcher Block
- Peninsula Cabinets
- Caulk
- Paint Roller for Cabinets
If you’re looking for more kitchen reno ideas, you can find details about my own reno using ikea cabinets, here.
Why This Budget-Friendly Kitchen Makeover Worked So Well
This budget-friendly kitchen makeover focused on improving the space’s look and function without permanent changes, making it the perfect solution while planning a future full renovation.
FAQs
The total cost was approximately $2,500, which included painted cabinets, new hardware, a beadboard backsplash, peel-and-stick flooring, an IKEA Sektion peninsula with butcher block, lighting, and a breakfast nook.
You can fill old cabinet hardware holes by cutting wooden dowels to size, gluing them in place with wood glue, sanding once dry, and finishing with a small amount of wood filler. After painting, the filled holes are no longer noticeable.
Yes, high-quality peel-and-stick tile can work well in kitchens when installed on a clean, level surface. It’s a popular budget-friendly flooring option for temporary updates and holds up well to everyday use.
Using IKEA Sektion cabinets for a peninsula is a cost-effective way to add storage and counter space. It’s also flexible, easy to install, and can be removed or reconfigured during a future kitchen renovation.
Living with this layout helps identify what works and what doesn’t. In a future renovation, they may upgrade flooring, countertops, and cabinetry. I think they would like to wrap the cabinets around to join up with the peninsula, and reconfigure the range to this wall. We estimated that replacing all cabinets and adding this new configuration would have cost about $10,000 using IKEA cabinets.


Very curious about the kitchen nook details!
They’re live now! Here you go: https://emmacourtneyhome.com/diy-breakfast-nook-banquette-using-ikea-besta-cabinets/