
IKEA Hack: Creating a Hidden Wardrobe with PAX
This Post May Contain Affiliate Links. Please Read Our Disclosure Policy.
Have you ever dreamed of having a beautiful “hidden” wardrobe that seamlessly blends in with your wall but are scared of the cost? Are you dreaming of a wardrobe that blends in with the panel moulding as you picture in a stunning Parisian apartment? This IKEA hack project will transform your pax wardrobe into a stylish and elegant piece of furniture that will elevate the entire room. I’m sharing the benefits of using a PAX wardrobe, the step-by-step process of the hack, and how you can customize the design to fit your personal style. Sharing how you can get the look for less by using IKEA Pax wardrobes.
Project completed in Spring 2021, post updated March 31, 2026, with more details and photos.

PAX Wardrobe
The PAX wardrobe is an excellent choice for versatile and cost-effective storage solutions. This wardrobe line, produced by IKEA, boasts a modular design that permits customers to tailor their wardrobe to their unique specifications. With options for doors, drawers, shelves, and accessories, the wardrobe comes in various sizes and finishes. The PAX wardrobe’s popularity stems from its affordability, versatility, and practicality, making it an excellent investment for any consumer looking to optimize their storage space.
The PAX wardrobe also makes a great building block for IKEA hack projects due to its versatility and various customization options.

Pax Wardrobe Sizing
The Pax wardrobe system is available in a variety of sizes to fit different spaces and storage needs.
- Widths: The wardrobe widths range from 50cm (19.7 inches) to 100cm (39.37 inches).
- Heights: The wardrobe heights range from 201cm (79.1 inches) to 236cm (92.9 inches).
- Depths: The wardrobe depths range from 35cm (13.8 inches) to 58cm (22.8 inches).
You can further customize the wardrobe through the various sizes and styles of doors to ensure you get a perfect fit for your space. Please check here for details on the sizing I used for my IKEA PAX Hack.
The PAX wardrobe is a great option since it offers the basic standard sizes and allows you to choose from a wide range of customized options, such as interior organizers, doors, and accessories. This means that you will be able to create a wardrobe that is tailored to your specific needs and preferences. It’s the perfect way to get exactly what you want out of your wardrobe system!

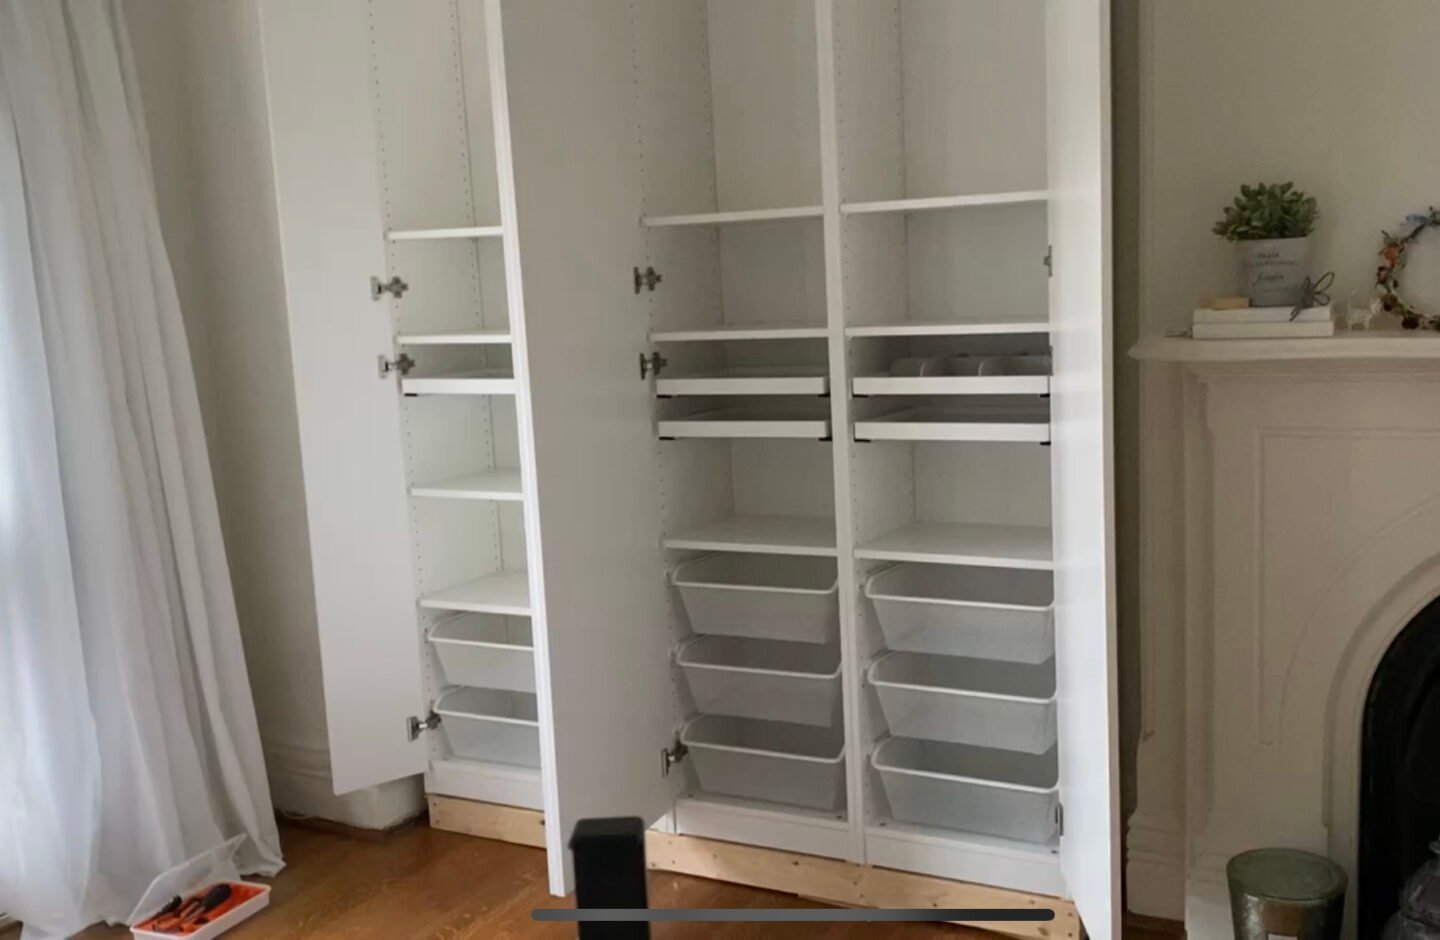
PAX Wardrobe Accessories
With an array of accessories at your disposal, the Pax wardrobe can be completely tailored to meet your exact specifications! Here are a few different examples:
- Interior Organizers such as shelves, wire baskets, and pull-out trays can be added to the inside of the wardrobe to help you better organize your clothes and accessories.
- Clothes Rails can be added to hang clothes from
- Divider Frames allow you to create compartments which are great for storing bags, shoes, hats etc.
- Interior Lighting can be added to make it easier to see clothing, and some act on a motion sensor so that it turns on when the door opens.
- Drawer inserts can be added to drawers of the pax wardrobe to help organize smaller items like socks, underwear, accessories, etc.
For my IKEA PAX hack, I opted to use shelves, wire basket drawers, and pull-out shelves for accessories with felt organizers. We have a closet in the bedroom for hanging space, so that wasn’t a concern for us.

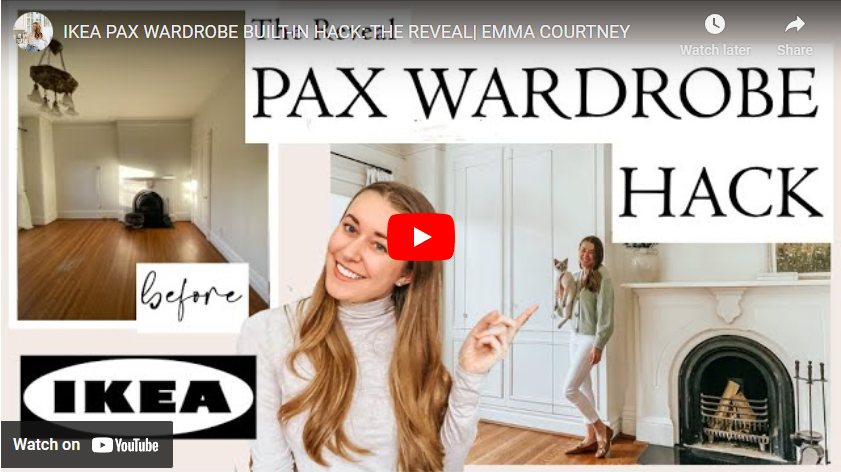
What is a Hidden Wardrobe
A hidden wardrobe is designed to seamlessly blend in with the wall or wall panelling, giving it a sleek and modern appearance. Unlike traditional wardrobes, hidden wardrobes are specially built to blend into your room’s architecture without compromising functionality. By fitting them into your walls or hiding them behind wall panelling, you can transform your room with an organized appearance that creates more space.
Hidden wardrobes are also customized to match your desired style and fit specific room measurements. They can be made from a range of materials such as metal or wood and finished with paint or wallpaper to blend perfectly with the surrounding walls.
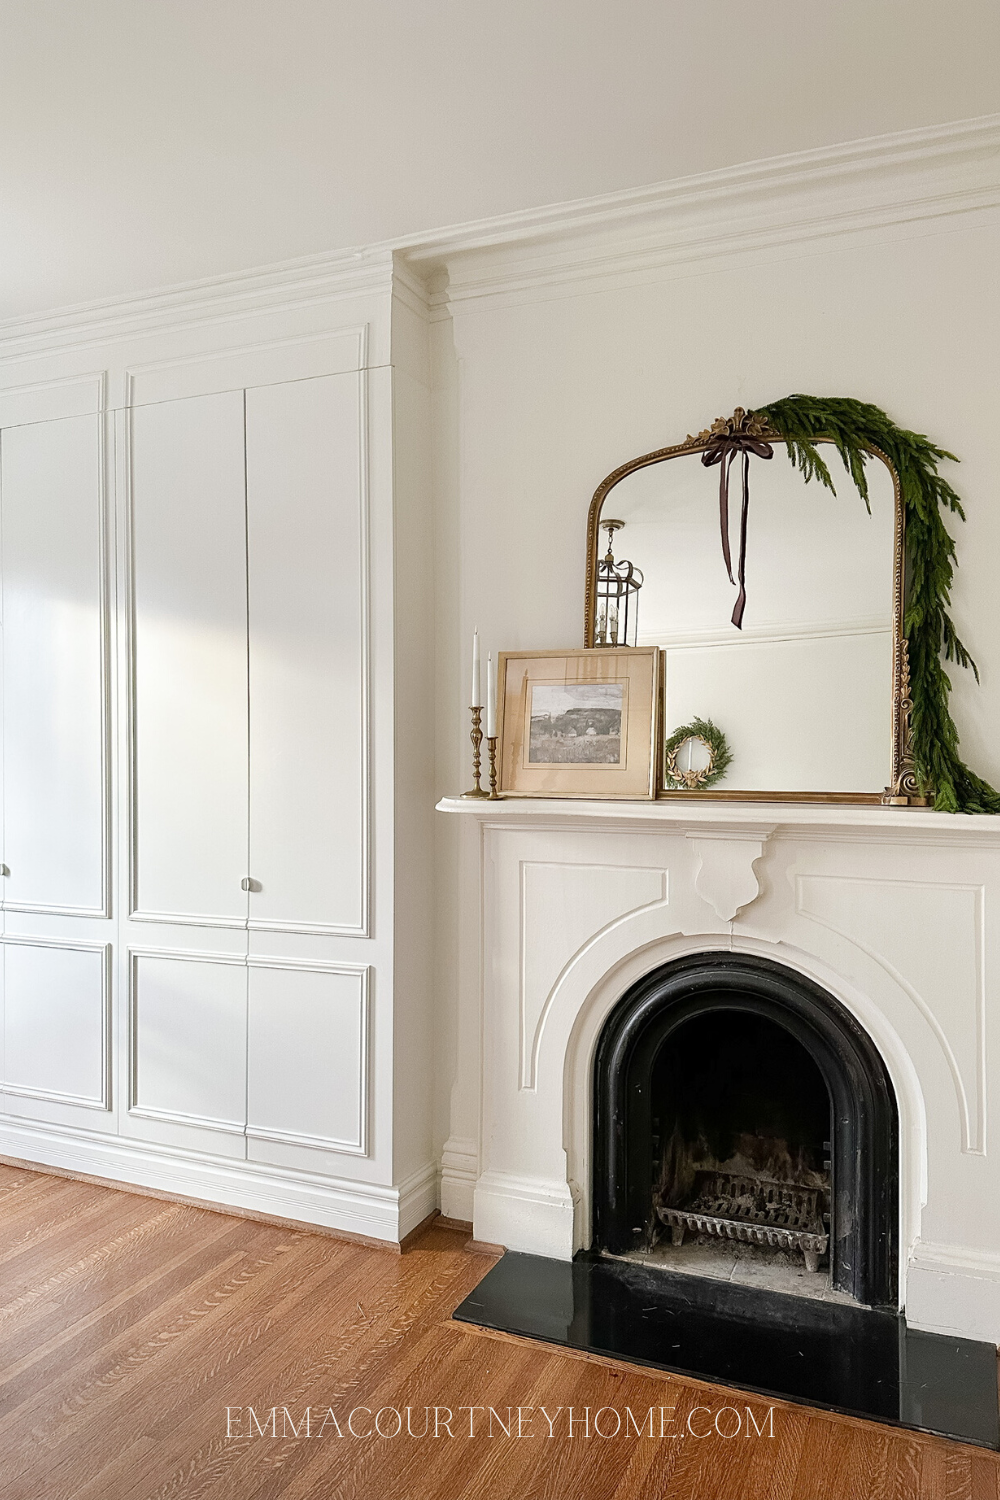
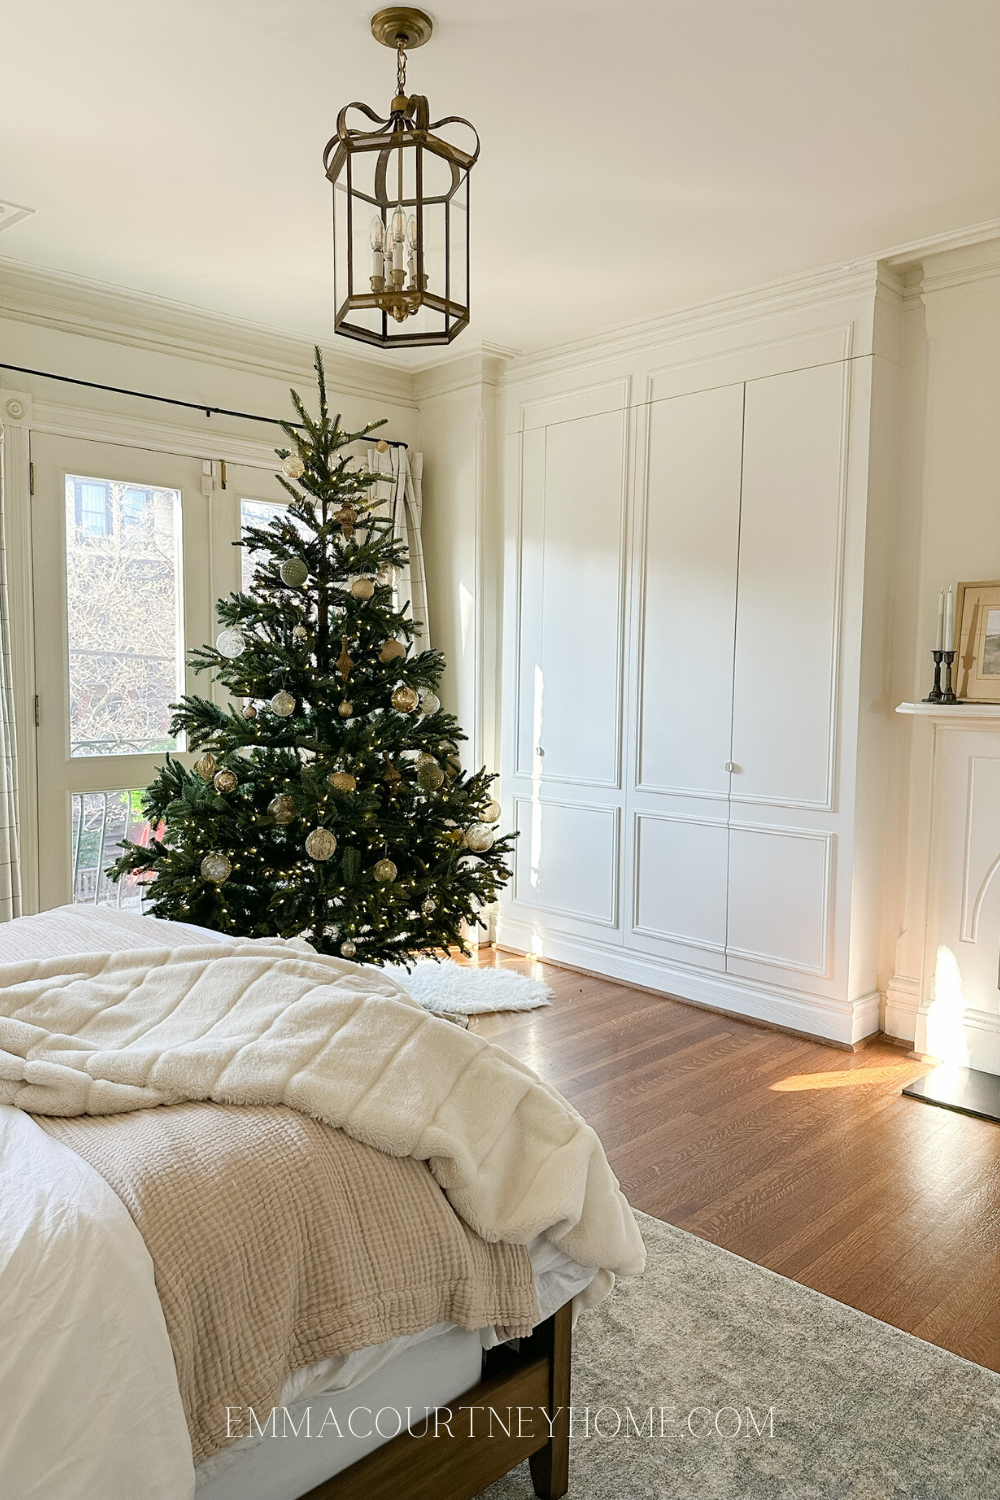
For this IKEA PAX hack project, I created the look of a hidden wardrobe to maximize storage solutions while still respecting the age and style of my home. The moulding helps the wardrobe seamlessly blend in with the rest of the trim in this space.

The Steps for the IKEA PAX Hack:
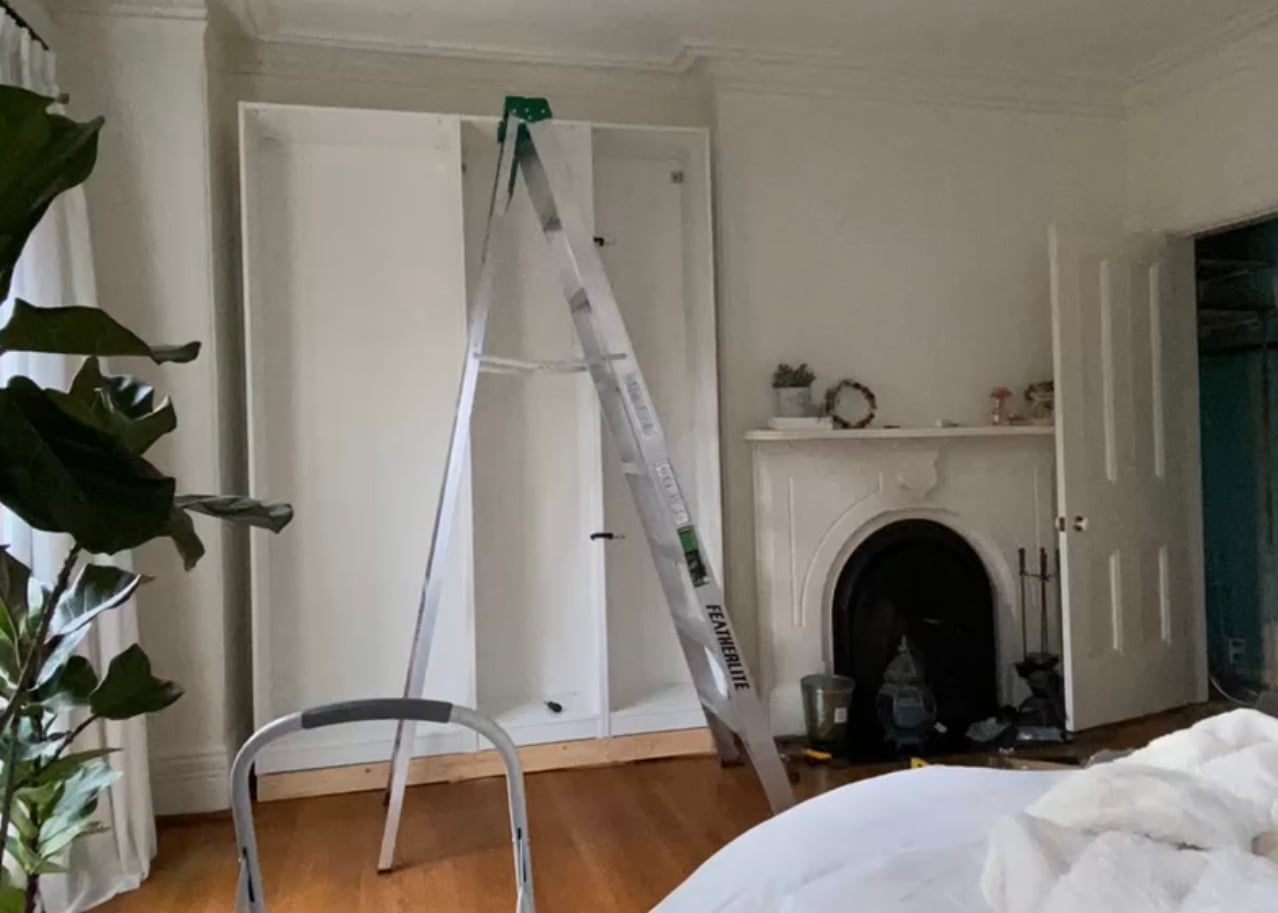
Step One: Build your IKEA PAX
Start by building the IKEA PAX Wardrobes for this hack.

Step Two: Remove Baseboards
Remove the quarter round and baseboard from the wall on which the wardrobe will be installed. If you do not want to remove the baseboard, that’s okay. You will need to install a block behind the upper half of the closet to ensure the wardrobe is not leaning backwards. You want the wardrobe to be standing up straight.
Step Three: Build a Base for the IKEA PAX hack
Next, you need to build a 2×4 base for the PAX wardrobe to sit on. This is a key to my IKEA hack projects since it will allow you to install a baseboard around the PAX wardrobe at the end.
It is important to ensure that all of the points that the PAX would usually touch the ground have a 2×4 underneath it (side to side and front to back).

Put this base in place where the wardrobe will be installed and ensure it is level. If it is not, use shims to get it level (side to side, front to back).
Place the PAX wardrobe on top of it.
Step Four: Creating Studs
Build a similar 2×4 structure for the top of the PAX. This is creating “studs” or a structure that will allow you to attach the trim to that connects the pax to the ceiling. You will eventually attach the drywall to this, so it needs to be flush with the front of the PAX.

Use screws to attach this structure to the pax. Predrill holes into the top of the pax and screw up into the 2×4 structure.
Step Five: Key to the Built-in look
If you plan to build in this IKEA PAX wardrobe hack similar to how I did, adding sides to make it look like it is built into the wall, you need to add blocks to the sides. Adding wood blocks allows you to attach drywall or trim to the sides and provides support. I recommend using scrap pieces of 2×4. Predrill into the sides of the PAX and attach these wood blocks with screws. This is similar to the previous step with the 2×4 structure for the top.
Step Six: Attach your Pax to the Wall
Next, attach the PAX to the wall. Following IKEA instructions for this.
If you did not remove the baseboard from the wall so the PAX sits flat against the wall, you would need to add blocks to ensure it sits flat. Use scrap pieces of wood to put behind the wardrobe at the mounting points of the PAX. Use a level to ensure it is flat. Then, use longer screws and attach the wardrobe to the wall through these blocks.
Step Six: Install the Doors
Install the doors and make sure you are happy with the positioning. I’d recommend installing the cabinet pulls at this point to make sure they don’t rub on each other and close easily.
Step Seven: Drywall
Start working on the drywall. This is a key part to this IKEA PAX hack since it makes the wardrobe look hidden/built-in.
Cut the drywall to size. Use drywall screws to screw the drywall into the wood studs you created. Repeat this step for the sides.
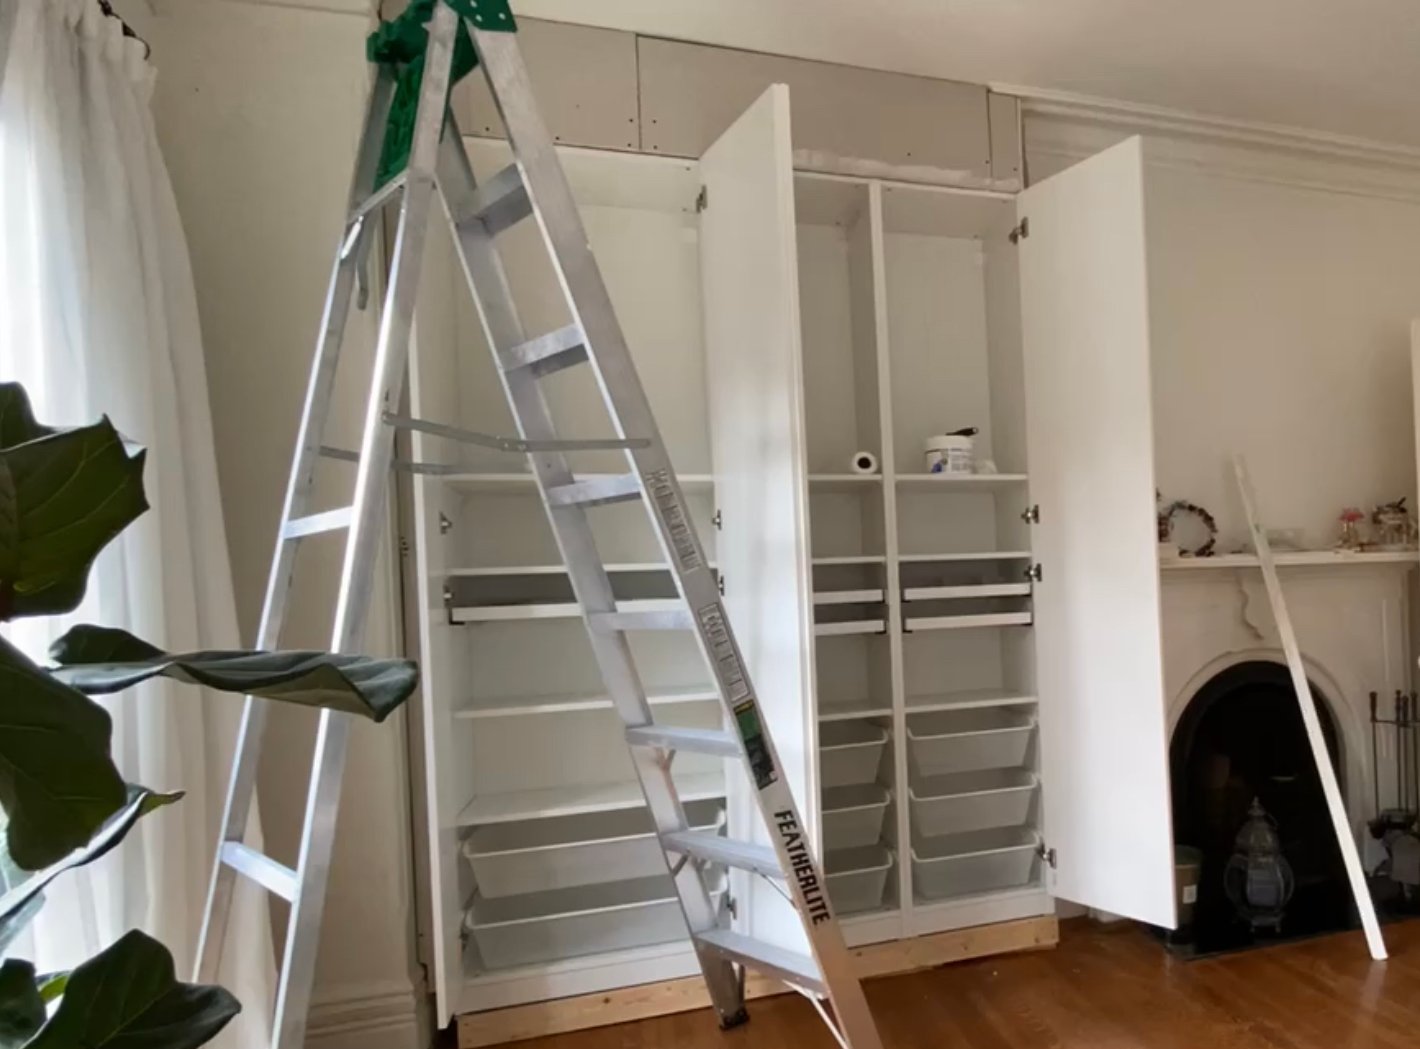
Ensure the positioning of the doors aligns perfectly with the doors. You may want to remove the doors to finish drywalling.
Use drywall tape where necessary (see video), and also a corner bead between the drywall and the top of the wardrobe. This part is a little tricky, but it’s what makes it look built-in. If you haven’t drywalled before, I recommend looking up some videos on how to do this! That’s what I did since it was my first time drywalling.

Step Eight: Prime and Paint
Once you’re finished with the drywalling and messy sanding, use prime to paint everything.
Step Nine: Trim
Add the crown moulding to match the rest of the room and panel moulding to the doors with No More Nails.

I recommend taping it out onto the doors with painter’s tape, then cutting one piece at a time. You need to be careful to ensure it lines up perfectly.
Step Ten: Install Baseboards
Install the baseboard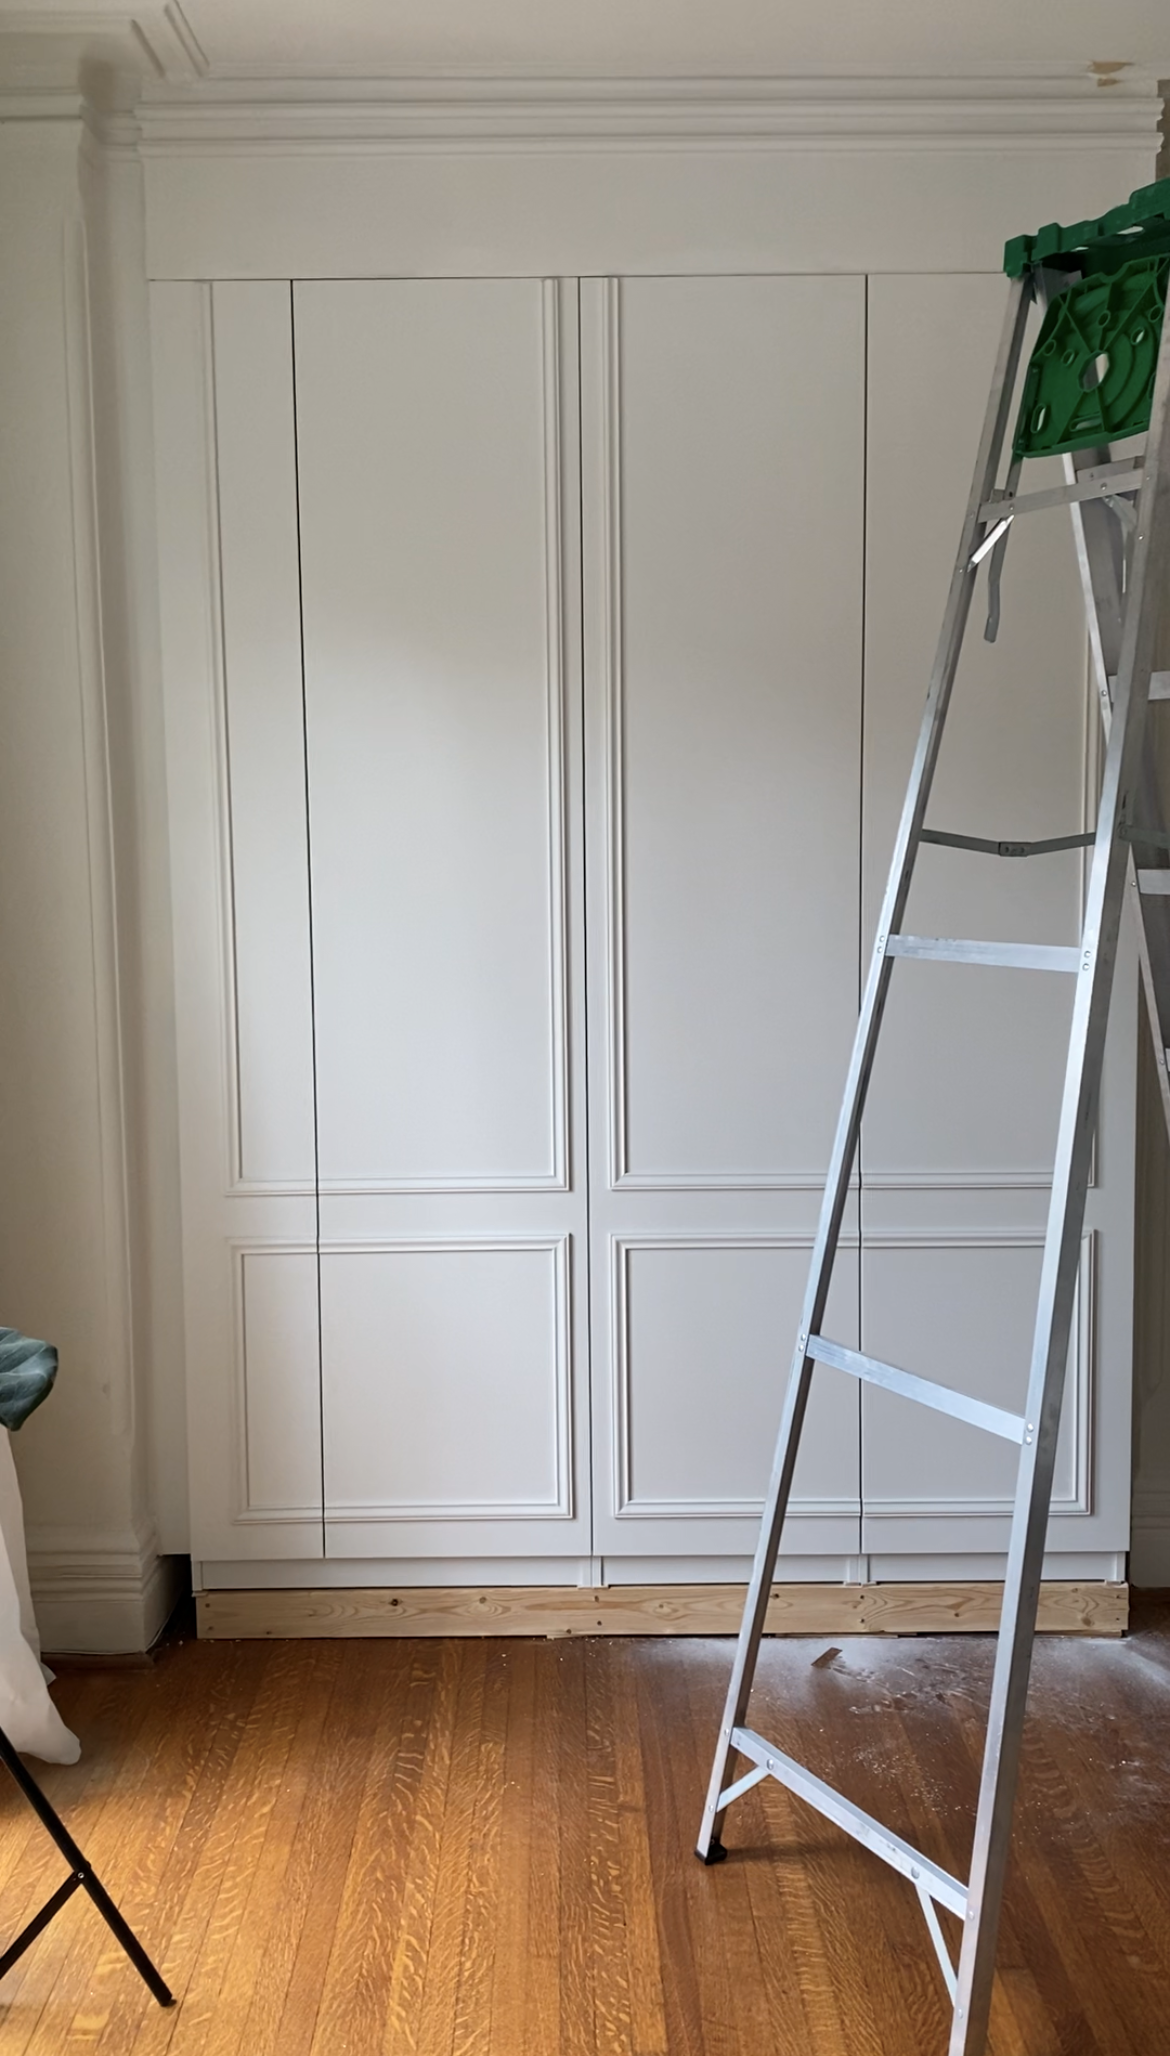
Step Eleven: Caulking
Carefully caulk any gaps between the moulding and the door.
Step Twelve: Paint your IKEA PAX hack Project
Paint your IKEA PAX hack project. I only painted the panel moulding (White Dove by Benjamin Moore) but didn’t paint the doors since the colour matched.
I personally believe it is best for durability if you leave the doors unpainted since that IKEA-manufactured finish on the door can’t be beaten. If you do end up wanting to paint the doors, I recommend using BIN Zinsser. I have used this to refinish other IKEA and furniture, and it holds up great!
Want to learn how to paint your IKEA Pax wardrobe and other furniture so that it doesn’t chip or scratch? Learn more here.
Step Thirteen: Quarter round
Install the quarter round. If your quarter round is painted, you will install it before painting in the previous step. I used stained wood quarter round and installed it after painting. I repurposed the quarter round I removed from the wall to ensure it matched the rest of the space and gave the hack that hidden wardrobe look to my IKEA Pax.

Materials/Tools for the IKEA PAX Hack:
Here is a list of the main items you will need to complete this project:
US Links
- Pax Frame 39 3/8″
- Pax Frame 29 1/2″
- Pax Door
- Drywall Tape
- Drywall Compound
- Corner Bead
- Snips
- Mitre Box and Saw
- Mitre Saw
- Brad Nailer
- Jigsaw
- Alex Flex Caulk
- Caulk Gun
- Liquid Nails
- Paint Colour
- White Handles
- Panel Moulding
Canadian Links
- Pax Frame 50cm
- Pax Frame 75cm
- Pax Door
- Drywall Tape
- Drywall Compound
- Corner Bead
- Snips
- Mitre Box and Saw
- Mitre Saw
- Brad Nailer
- Jigsaw
- Alex Flex Caulk
- Caulk Gun
- No More Nails
- Paint Colour
- White Handles
- Jewelry Organizer
- Jewelry Organizer 2
- Panel Moulding
One thing I wish I had to complete this project was a Mitre Saw. It was necessary to cut the baseboard for the project! I found a way around it that I wouldn’t recommend/wasn’t perfect!
Project Photos
Before

After

Videos of the PAX Wardrobe Hack:
It’s almost been almost two years since I completed this IKEA Pax Hack, and it’s holding up amazing, zero issues, and I still look at it in awe that I made it happen with Pax Wardrobes! If you are more visual, please check out the videos from this project. When I completed this project, I really didn’t know what I was doing and had to look up a lot along the way. I usually film vlog-style, so I apologize in advance for the non-DIY-related clips included in these videos!
Project Video Part One

Part Two

Part Three
If you have any questions, please feel free to leave a comment below or on any of the YouTube videos, and I’ll get back to you!
More home decor ideas
- Painting IKEA Pax and Other Furniture
- Paint Colours in my Home
- IKEA Sektion: Built-In Wardrobe For Sloped Ceilings
- Pax Wardrobe Hack 2.0


Hi Emma, I’m trying to create some built-in Billy shelving into a wall niche in my house. i suppose the method is similar to Pax. Do you think i should infill the gaps using dry wall? or using Billy panels? I’m using them in oak color. the Billy oxberg doors already come with an inset detailing. So I’m thinking to infill the gaps on two sides with flat panels. however, as my walls are concrete, i will have difficulty drilling into them, so i was thinking of using adhesive tape. do you think that works? Many thanks!
I think it depends on the look you want. I would fill the outer gaps with drywall, inner gaps with Billy panels that match the bookcase. I would also rent a hammer drill and get tapcon screws or whatever your hardware store recommends for going into concrete. I don’t think adhesive would be good over time, I would be worried about it unsticking in years due to humidity changes!
Your bedroom closet is amazing. I’ve been looking for a solution to the weird small door ikea issue. The space I have is 175cm so, I was thinking 100 + 75, but it would be unbalance due to the small door, but the trim you used around the two sets of doors seem to bring back symmetry. lol, must be difficult to be that precise. The alternate solution I was thinking was 50cm, 100cm cabinets and leave a space in between the two cupboards with shelfs, but I have no idea how to make it work properly.
I’m curious, have you ever done a project with Ikea Sektion kitchen? Ie. the Ikea railing system prevents the cabinets from going to the ceiling, and the space left at the top is small enough to makes it difficult to come up with a trim to provide a finished look.
Anyway, your designs are inspiring. Thanks for sharing.
Hey James, Thanks so much! I did this project with the sektion system https://emmacourtneyhome.com/ikea-sektion-built-in-wardrobe-for-sloped-ceilings/ but maybe you can use one of the taller sektion cabinets. I don’t think you need to do the railing system is necessary, you can mount and install without it (if the cabinets are sitting on the floor it should be okay).