
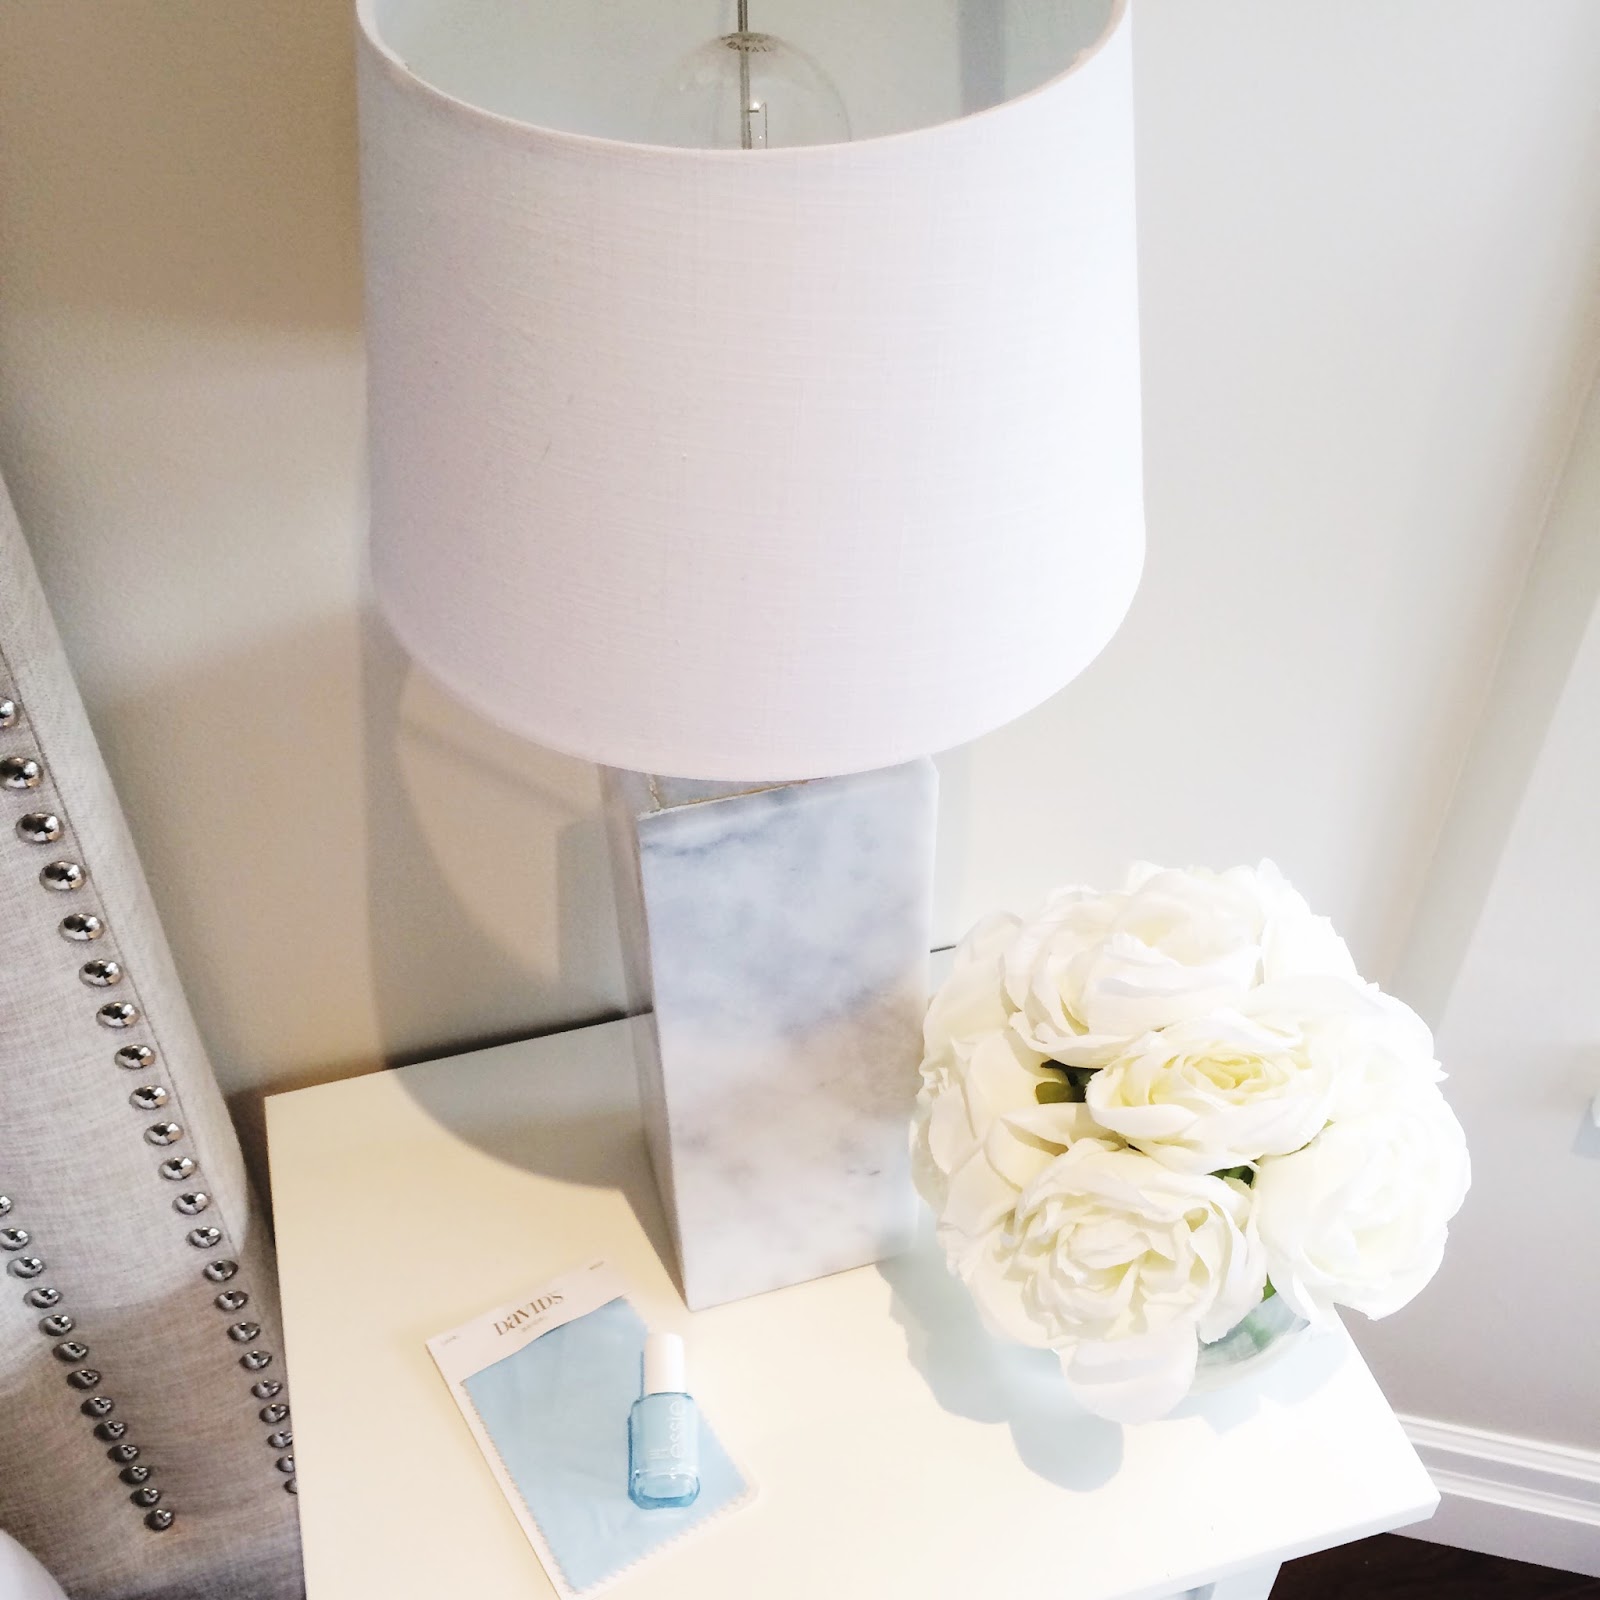
DIY Marble Lamp Base
This Post May Contain Affiliate Links. Please Read Our Disclosure Policy.
Lighting your home with a personal touch is rewarding and stylish, especially with this DIY marble lamp project. It’s a fantastic and affordable way to introduce elegance into any room. Using marble bathroom tiles and a simple lamp kit, you can create not just one but two beautiful marble light fixtures for under $100. Let’s delve into the steps to craft your DIY marble lamp base.
Originally Published August 2017, Updated January 2024
Estimated reading time: 5 minutes

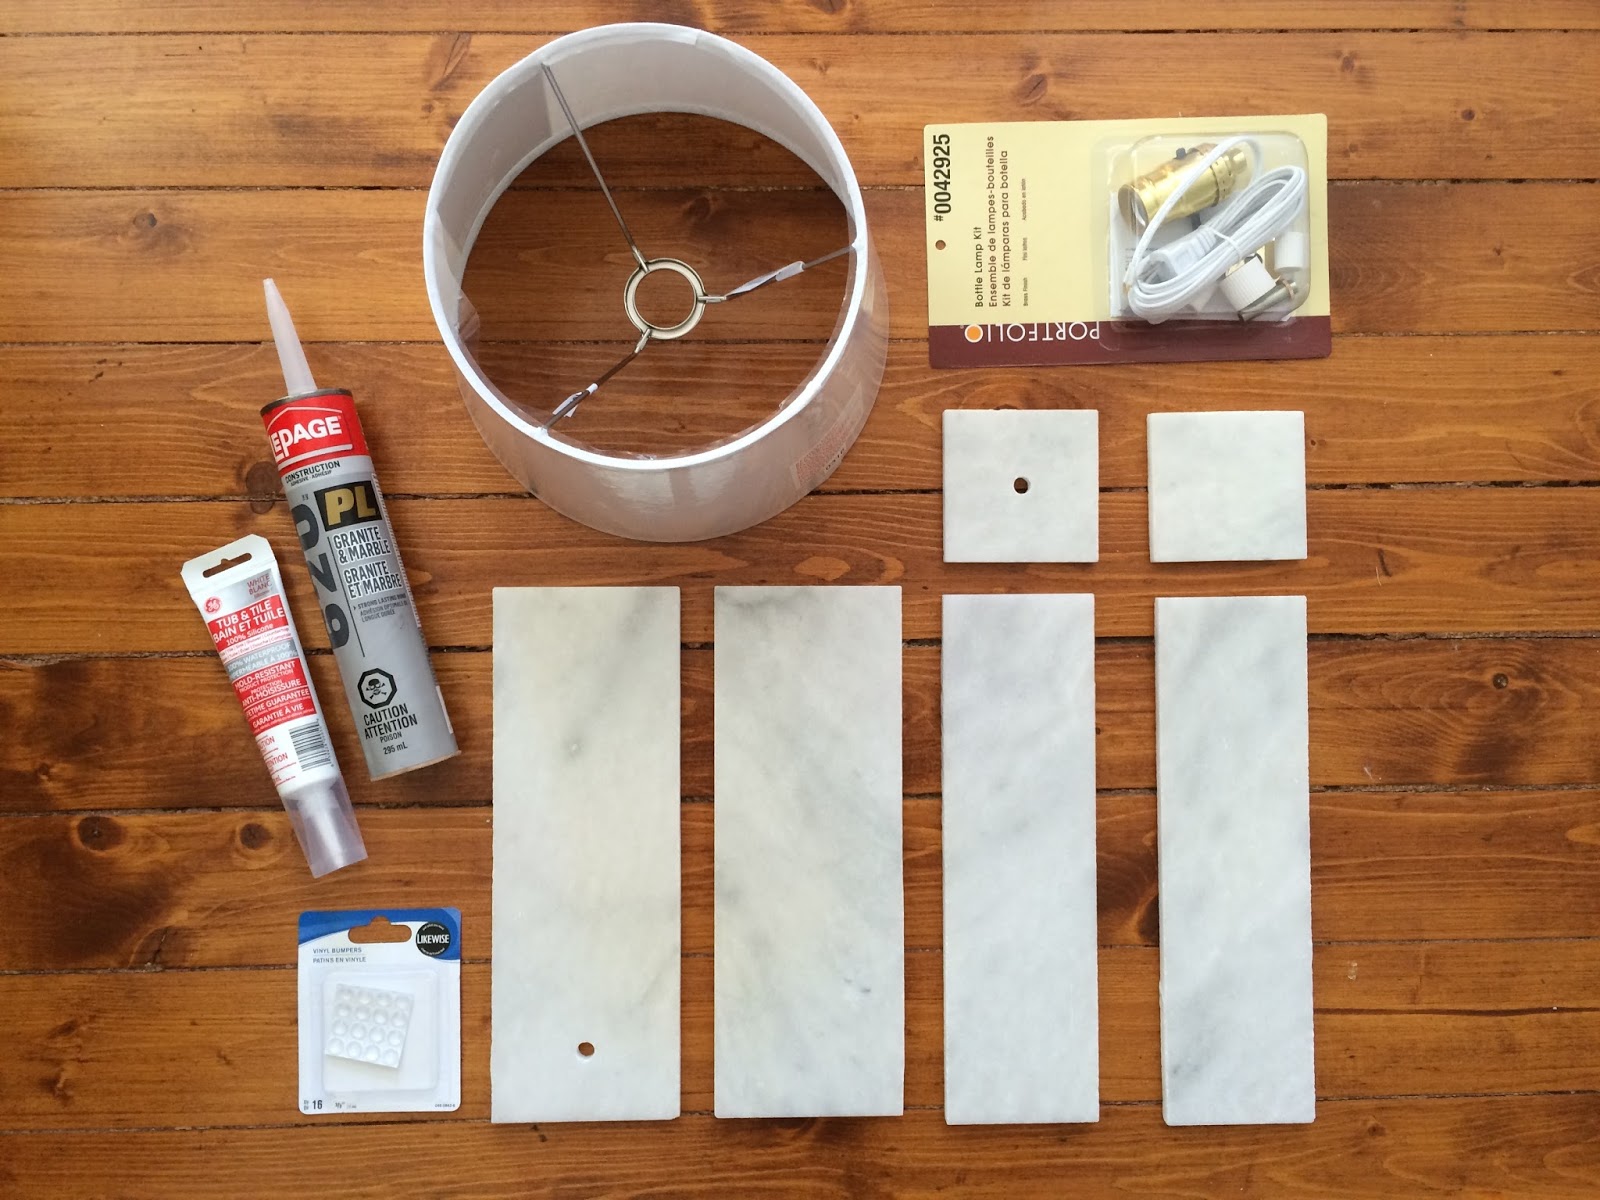
Materials Needed for Your DIY Marble Lamp
- Lampshade allen + roth 7-in x 10-in White Fabric Drum Lamp Shade C$13.99 x 2
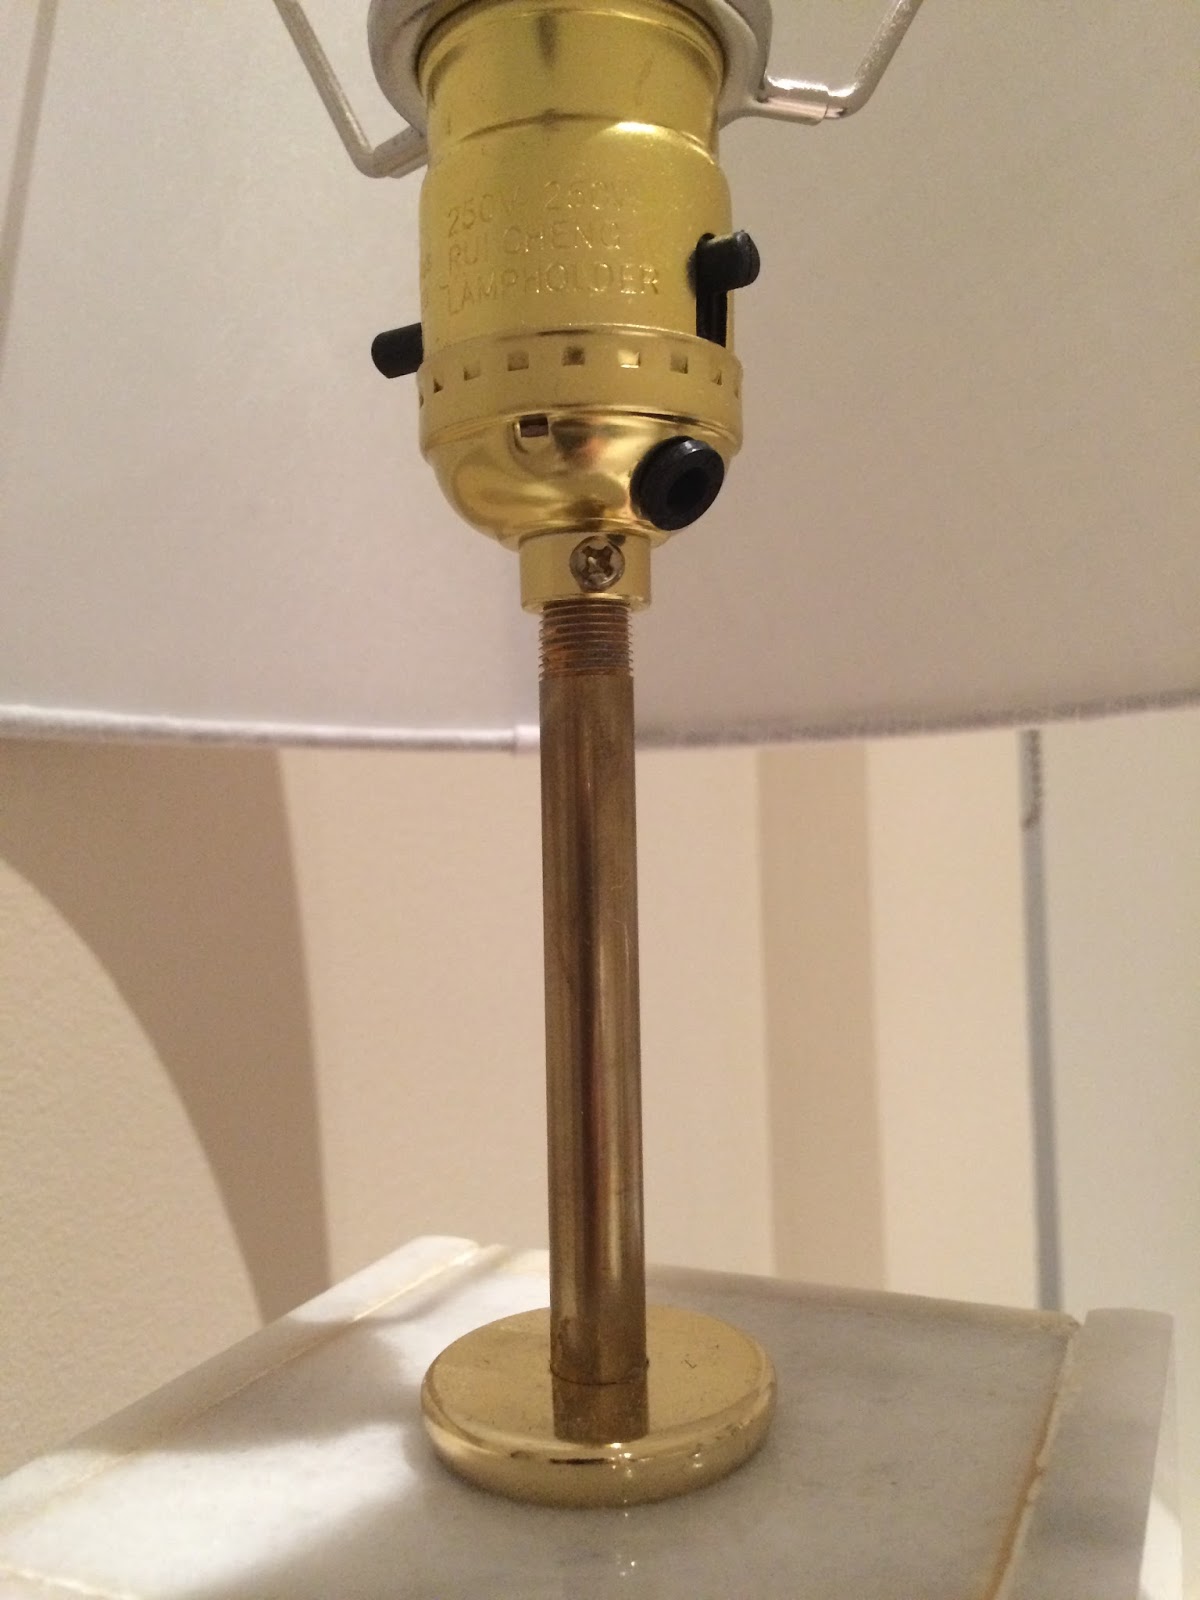
- Lamp Kit Portfolio White/Brass Bottle Lamp Socket Kit C$7.99 x 2
- Brass piece Watts A-721 1/8-in Brass Nipple $4.49 x 2
- Brasso Brasso, Metal Polish, Cleans and Polishes – Brass Bronze Copper Stainless Steel, 142 ml C$6.99 + a rag
- Marble Faber 12-in x 24-in Carrara Extra Marble Polished with White and Grey Hues Floor Tile C$15.98 x 3
- Drill Bit BLACK + DECKER 3/8-in x 6-in Rotary Masonry Drill Bit C$3.00
- Caulk GE Sil I 2.8-oz Unsanded Silicone Kitchen and Bathroom Caulk, White C$4.49
- Glue LePage PL620 295ml Granite and Marble Construction Adhesive C$10.99
Steps to Create Your DIY Marble Lamp Base
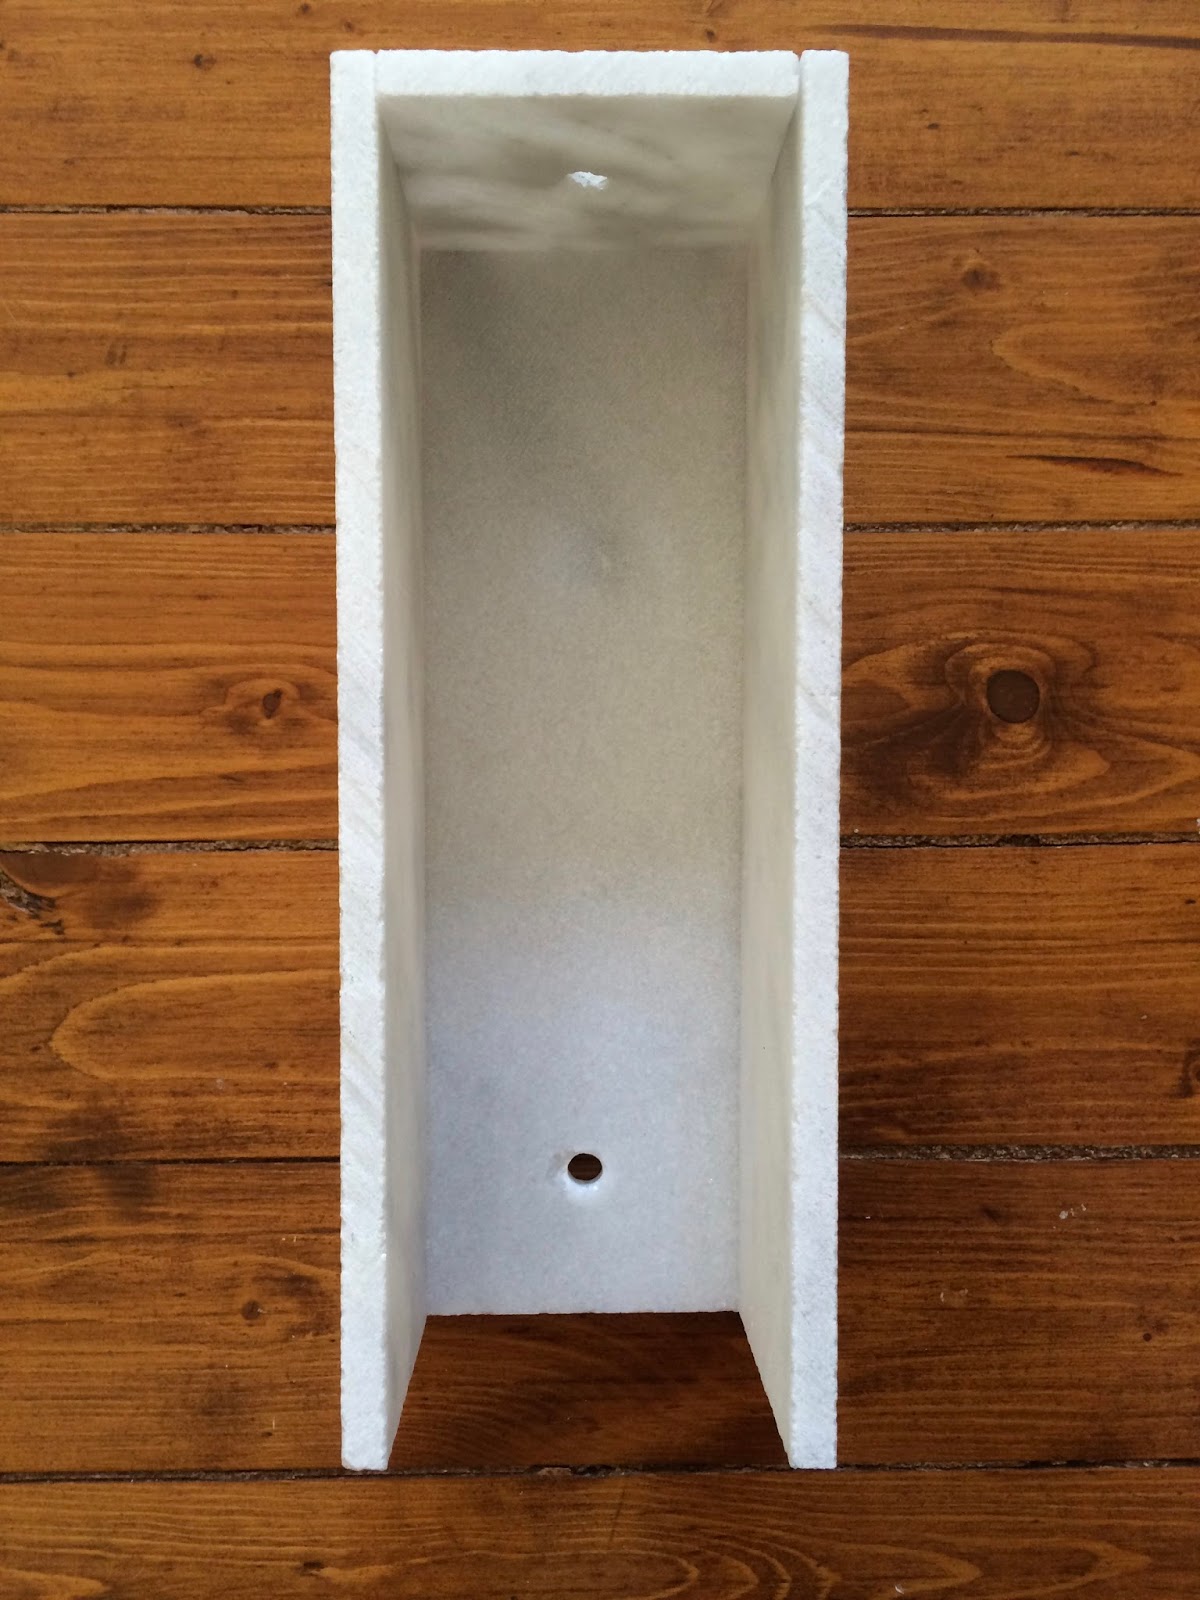
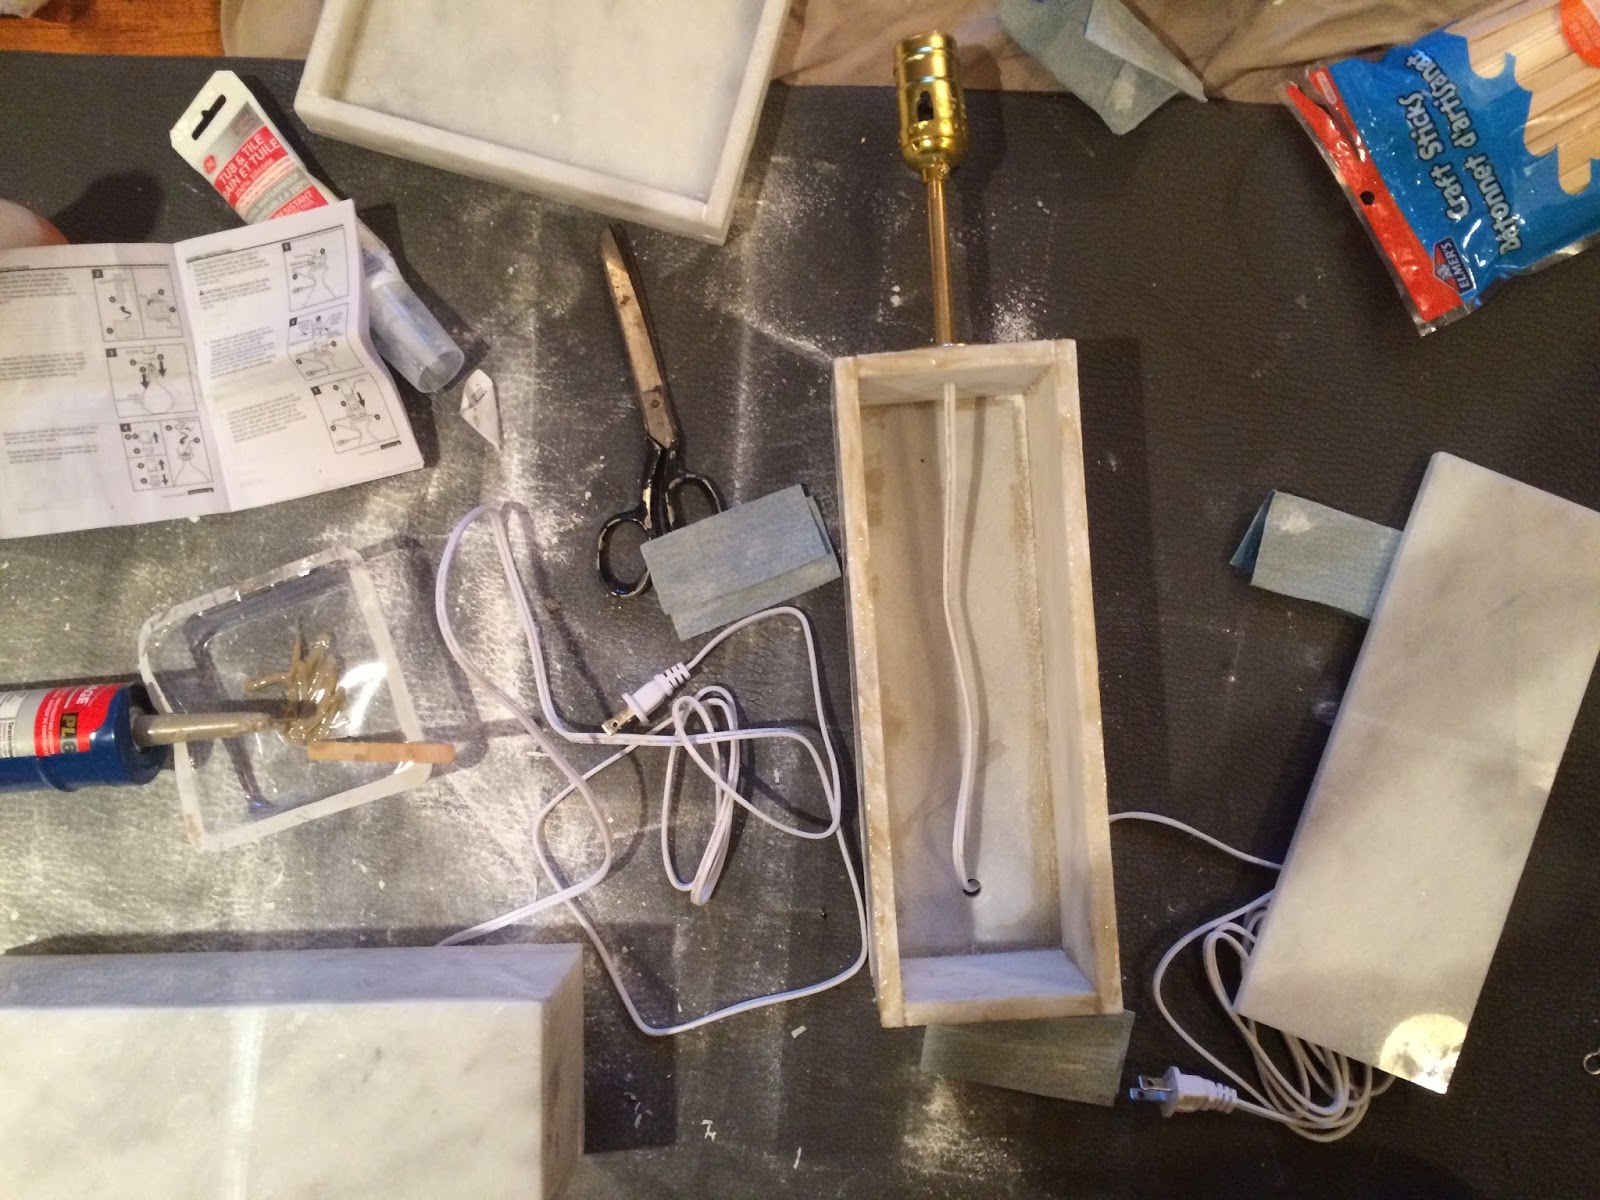
- Cutting the Marble
- Measure and cut 4 pieces of each of the following from the marble
- 3 1/2″ x 12″
- 4 1/4″ x 12″
- 3″ x 3″
- Sand down the edges for a smooth finish.

- Drilling Holes
- Drill a hole in the center of two 3″ x 3″ squares for lamp wiring.
- Drill another hole near the bottom of two 4 1/4″ x 12″ pieces for the wiring exit.
- Assembling the DIY Marble Lamp Base
- Glue the top 3″ x 3″ piece and two 3 1/2″ x 12″ side pieces to the back 4 1/4″ x 12″ piece.
- Ensure neat application of glue as it dries yellow.
- Setting Up the Light
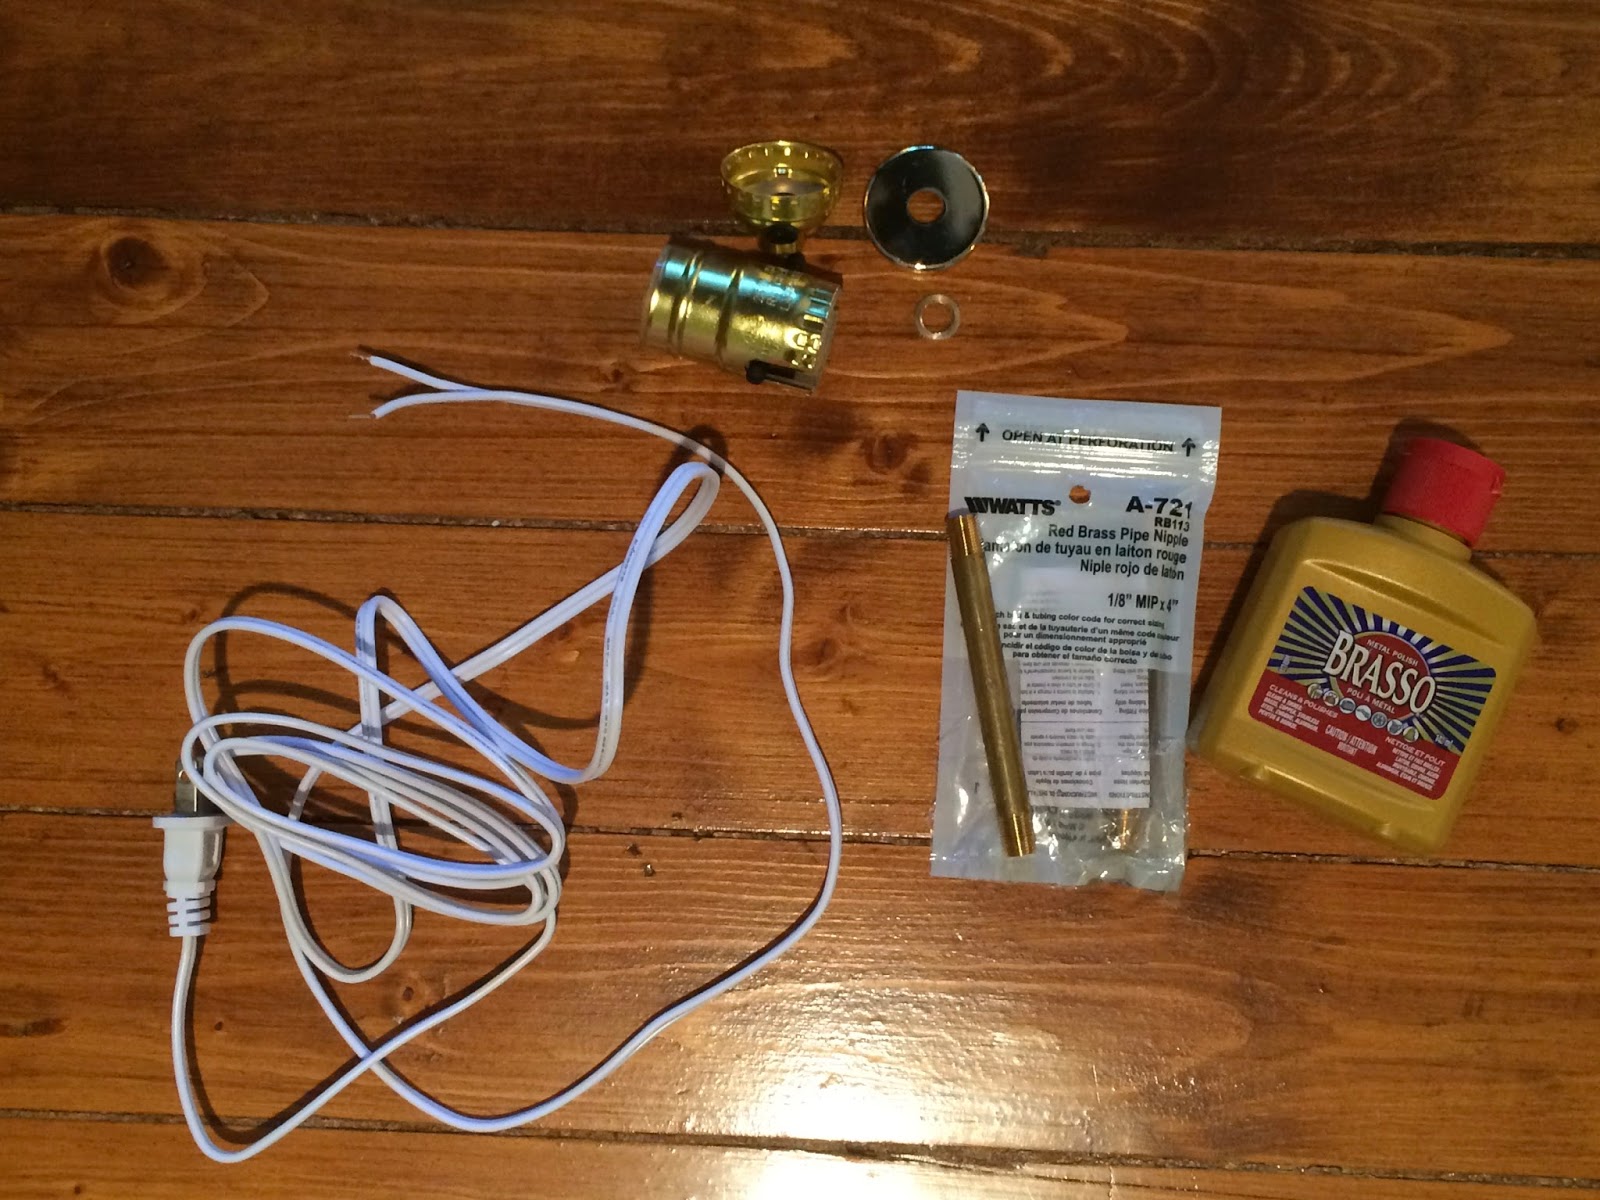
- After the glue dries, run the wires through the marble lamp base following the lamp kit instructions.
- Polish the brass pipe with Brasso and feed the wire through it.
- Attach the gold cap from the kit over the pipe for a clean look.
- Final Assembly
- Secure the bottom rod to the marble lamp base.
- Attach the bottom and front marble pieces.
- Use caulk to seal any gaps for a smooth finish.
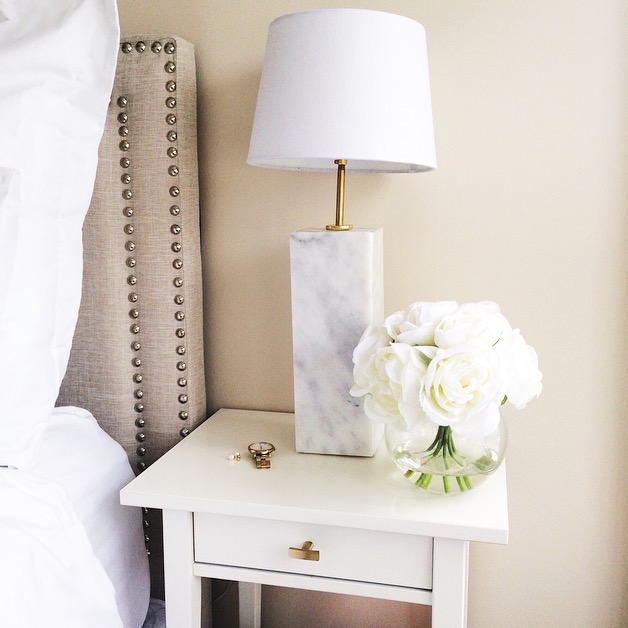
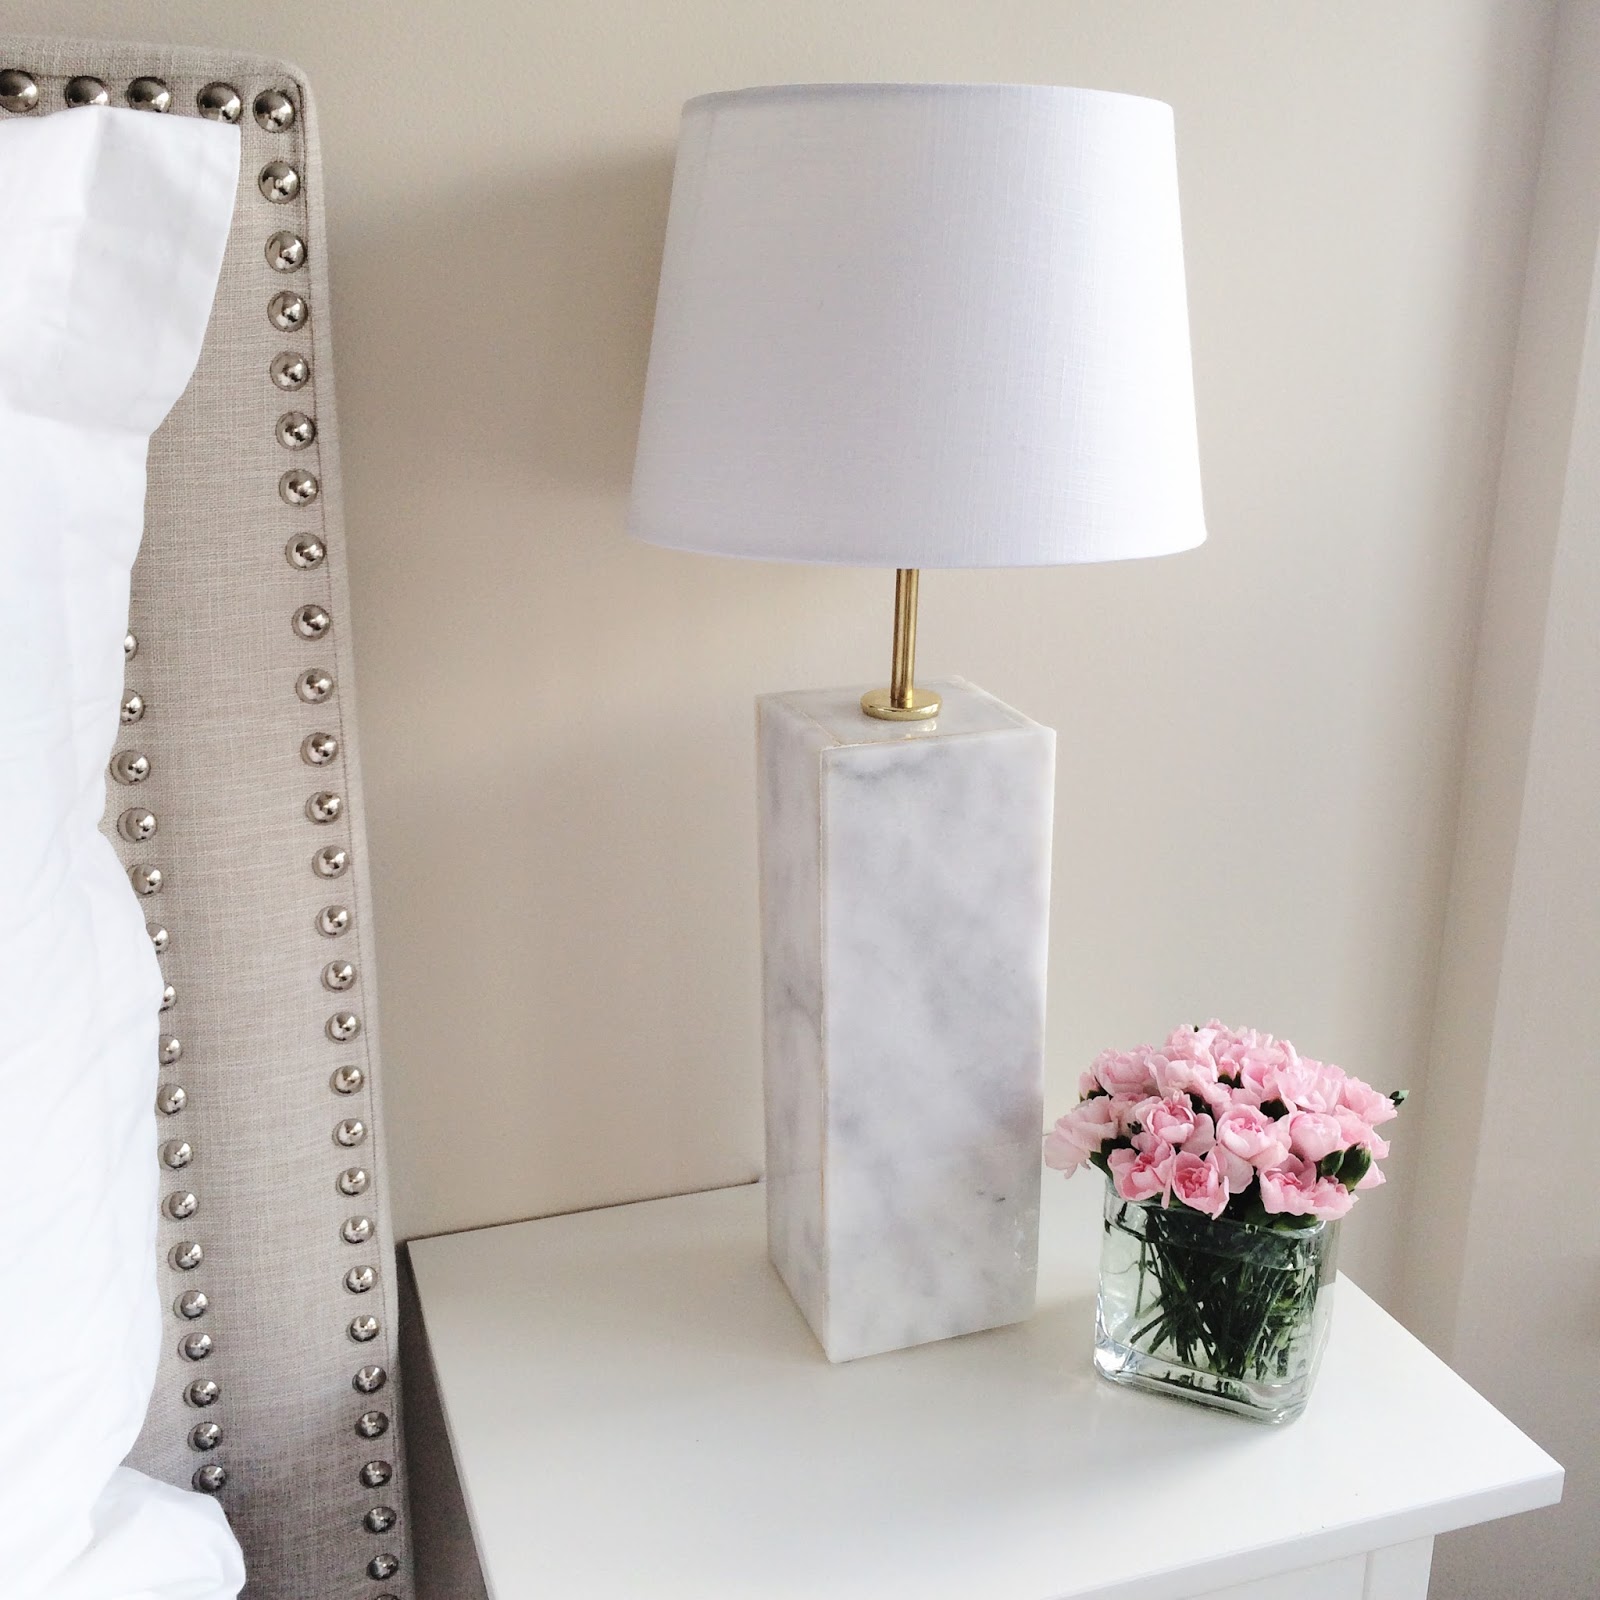
- The Reveal
- Now you have your finished marble lamps, you cant get to the fun part of styling!
Looking for more DIY lighting projects? Check out my designer-inspired chandelier project here.
Bonus DIY Project: Marble Tray from Leftover Tile
Materials: Leftover marble tile
Measurements:
- Square base: 8 3/4″ x 8 3/4″
- 4 Strips: 1″ x 8 3/4″
Instructions: Cut a square base and four strips and glue them together for a stylish marble tray.
Crafting a DIY marble lamp or a marble light fixture is not just a cost-effective project; it’s a creative journey that leads to a unique and personal addition to your home décor. With these straightforward steps, you can transform simple materials into a stunning and functional work of art. Enjoy your DIY adventure!


This is a great idea! I love marbles and can't wait to try this DIY! Thank you for sharing 🙂
One should also verify specifications of the product like whether or not it has a sufficient sad symptoms
Ordinarily a new layer of paint will truly liven up the place. Possibly a totally change of shading in the event that you need to get strong. quartz countertops in Olathe kansas
The light erupting from Tiffany recolored glass lamp shades is so extraordinary, you wind up addressing how such a small light can cause such force of light! Tiffany lamps make a sensational impact to any room. happy lamp
Blue light is destructive in light of the fact that it's the most elevated vitality wavelength of noticeable light.
LED GU10 Bulbs
. They can be made in practically any structure, including adjusted which is something that may not be done effectively with regular stone kitchen gadget
, LED is the keen move for them. Changing to LED light has diminished their vitality cost without bargaining with light quality.
E14 LED Bulbs
My friend recommended this blog and he was totally right keep up the fantastic work! read full article
gf
thanks for this usefull article, waiting for this article like this again. 192.168.l.l is a private IP address used to login the admin panel of a router. PLease visit my site.
There are far too many examples to list here but I will mention a couple of the more important ones. floor standing lamps
Insanely comprehensive 🙂
Thank you so much,
Now I have something to read during the holidays. This will take a while but well worth it like always
You can read another one here DiYsBest
We have a large window space and we currently have nets and some black out curtains, and we are looking to upgrade our windows and we know that the company VELUX offer a wide range of options. So we can finally get rid of those nets and have beautiful windows and some blackout roller blinds from VELUX Blinds Direct, my favourites are the pale pink and light grey.
You will have to hire an experienced basement lowering contractor to supervise the work. Basement Renovations For large cracks or different sorts of risky splits or cracks, for example, those in zones where bolster shafts meet the establishment divider, it is best to get an expert organization to settle the issue.basement tile
Simply want to say your article is as surprising. The clearness in your post is simply great and i could assume you are an expert on this subject. Well with your permission allow me to grab your feed to keep updated with forthcoming post. Thanks a million and please continue the enjoyable work.
Salt Lamps
salt lamps shop UK
himalayan pink salt lamp uk
pink salt lamps online
himalayan salt lamps in United Kingdom
Pink salt lamp online shop uk
himalayan salt lamps UK
pink salt himalayan lamps
natural himalayan salt lamp
pink salt himalayan lamps uk
pink salt lamp price in UK
natural rock salt lamp online
salt lamps shop online
lamps of himalayan pink salt
salt lamp shop
salt lamp online
Salt lamps uk